SCVMM 2012 Evacuate VMHost and maintenance script

A customer found the bug that exists in the System Center Virtual Machine Managers function for setting a host in maintenance mode. The bug is that when you set a host in maintenance mode it will live migrate all VM´s to the next node in the cluster. This is kind of impractical when you for example want to patch the Hosts and you end up with the last host that is filled with in worst case all  VM´s on it and it takes longer time to live migrate them. The VMM bug should be fixed in the SC SP1 that is coming soon This of course depending on if you have enabled the Dynamic Optimization, that function helps you with the distribution but that will take some time before it runs.

He made a script for evacuating the host and distributing the VMs to the other nodes in the cluster. I have added a bit of logic that also set the host group to not allow dynamic optimization during the scripted evacuation.

The load balancing in my script is quite easy because right now the only thing I look at is the host memory and migrate the VM to the Host that has most memory left at the moment.

<#
.Synopsis
   A function to evacuate a host in vmm and set it in maintence mode
.DESCRIPTION
   This function migrates all your VM´s to other nodes in the cluster based on available Host memory
.EXAMPLE
   Evacuate-SCVMHost -VMHost hyp02 -HostGroup DC01
.Notes
Niklas Akerlund/Lumagate 2012-11-25
#>
function Evacuate-SCVMHost
{
    [CmdletBinding()]
    [OutputType([int])]
    Param
    (
        # What VMHost you want to set to maintmode
        [Parameter(Mandatory=$true,
                   ValueFromPipelineByPropertyName=$true,
                   Position=0)]
        $VMHost,

        # In what hostgroup the host resides 
        $HostGroup
    )
    # Get The cluster and disable the dynamic optimization during evac 
    $HostGroup = Get-SCVMHostGroup $HostGroup
    $HostGroup | Get-SCDynamicOptimizationConfiguration | Set-SCDynamicOptimizationConfiguration -ManualMode 
    $VMHost = Get-VMHost $VMHost
    # Evacuate the host
    $VMs = $VMHost | Get-VM
    foreach ($VM in $VMs){
        # Find the most apropriate Host in cluster for each VM
       $VMHostTarget = Get-SCVMHostCluster -VMHostGroup $HostGroup | Get-SCVMHost | where {$_.ComputerName -ne $VMHost.ComputerName} | Sort-Object AvailableMemory -Descending | Select-Object -First 1
       Move-SCVirtualMachine -VM $VM -VMHost $VMHostTarget  
        
    }
    # Set the host in maintmode
    Disable-VMHost -VMHost $VMHost -MoveWithinCluster
    # Enable dynamic optimization
    $HostGroup | Get-SCDynamicOptimizationConfiguration | Set-SCDynamicOptimizationConfiguration -AutomaticMode
   

Internet Explorer 6.0 in my Win8 Enterprise version

Yesterday I too the challenge from VMware Sweden to be the first presenting an image of an working Thinapp 4.7.3 packaged Internet Explorer 6.0 on a Windows 8.

This function within ThinApp is quite powerfull. Think of the enterprise applications that have an legacy webapp and that does not allow you to upgrade your web browser cause then it stops working. So how do you do when your users also are connected to the internet and the vulnerabilities out there when you do not have an updated web browser.

Here the ThinApped Internet Explorer comes in to play. You can use the ThinApp ThinDirect for those url containing the corporate web sites that require an older web browser and without the user needing to do anything they get the virtualized IE6 connecting to that site.

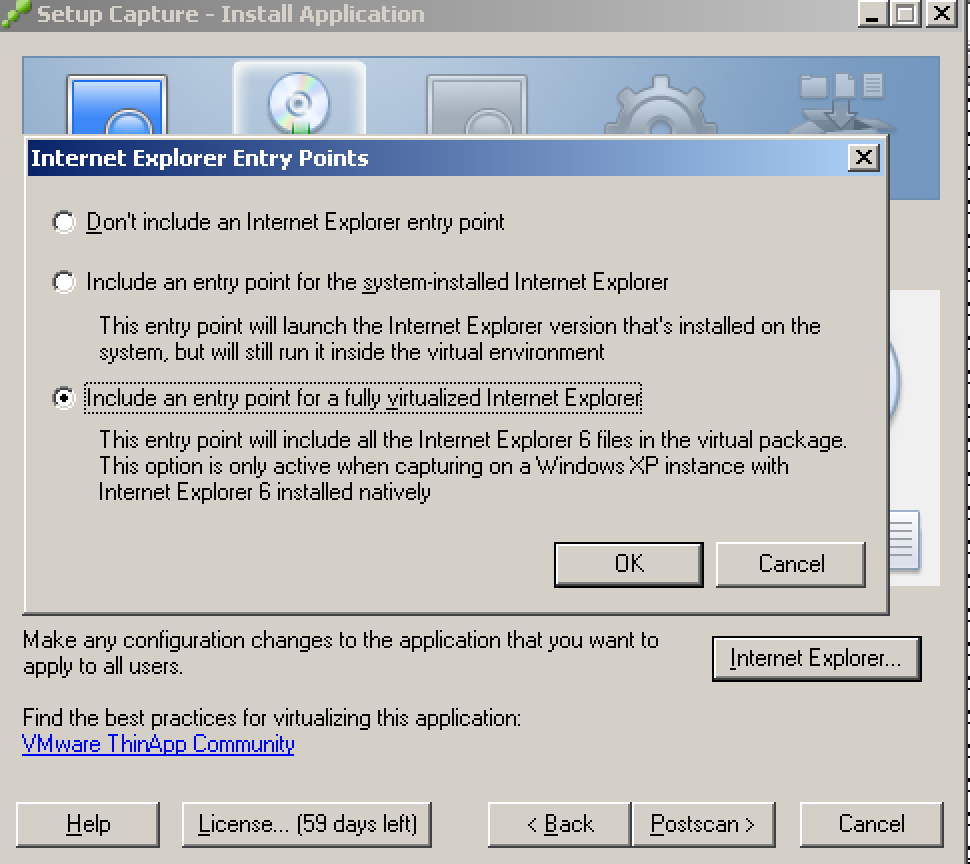
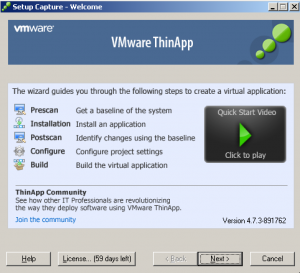
Here is a screendump on the configuration dialog for the Internet Explorer, and if I want the Internet Explorer 6 extracted from the OS ( in this case I am getting mine from a win 2003 Sp1)

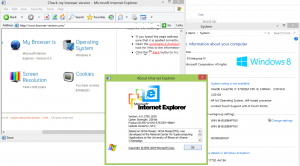
And here you can see when I am running the IE6

I think that it is really easy to create ThinApped packages and also so powerful as you can see!

Scheduled Defrag in Windows 2008 R2 disabled by default

I was at a customer yesterday and got a tip about the defragmentation in Windows 2008 R2. It came up when we where discussing about the SCOM and an alarm in Operations Manager regarding fragmentation on monitored volumes.

I thought that it was doing things automatically but the scheduled task that is responsible for the defragmentation is disabled by default. Now there is different best practices regarding if you should be defragmenting the volumes if it is virtual machines residing on a SAN. If you have physical servers with local drives I would definitely say that you should be doing defragmentation.

So how do you see if your defragmentation task is enabled or not?

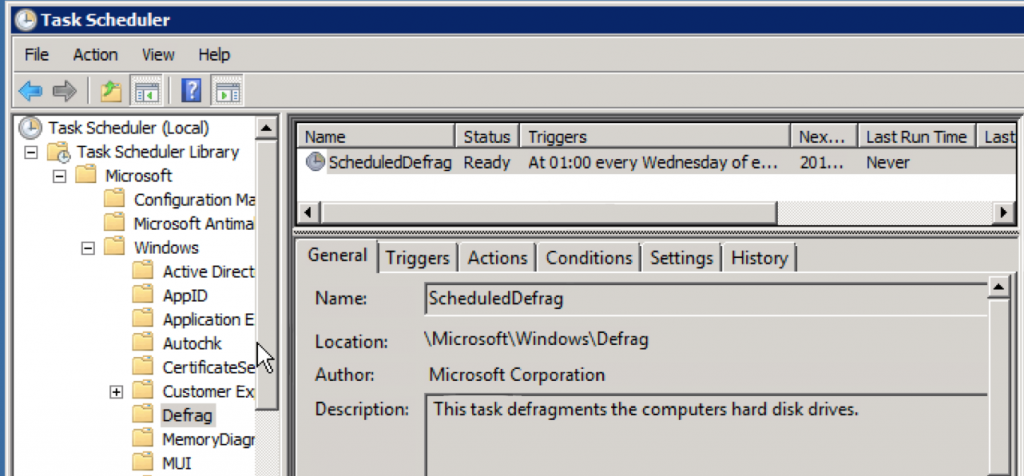
Open the Task Scheduler from Administrative Tools and go to Defrag

Then if you check the properties by changing to triggers on the scheduledDefrag task and look, you will see that it is disabled by default, double click on task and you can edit it.

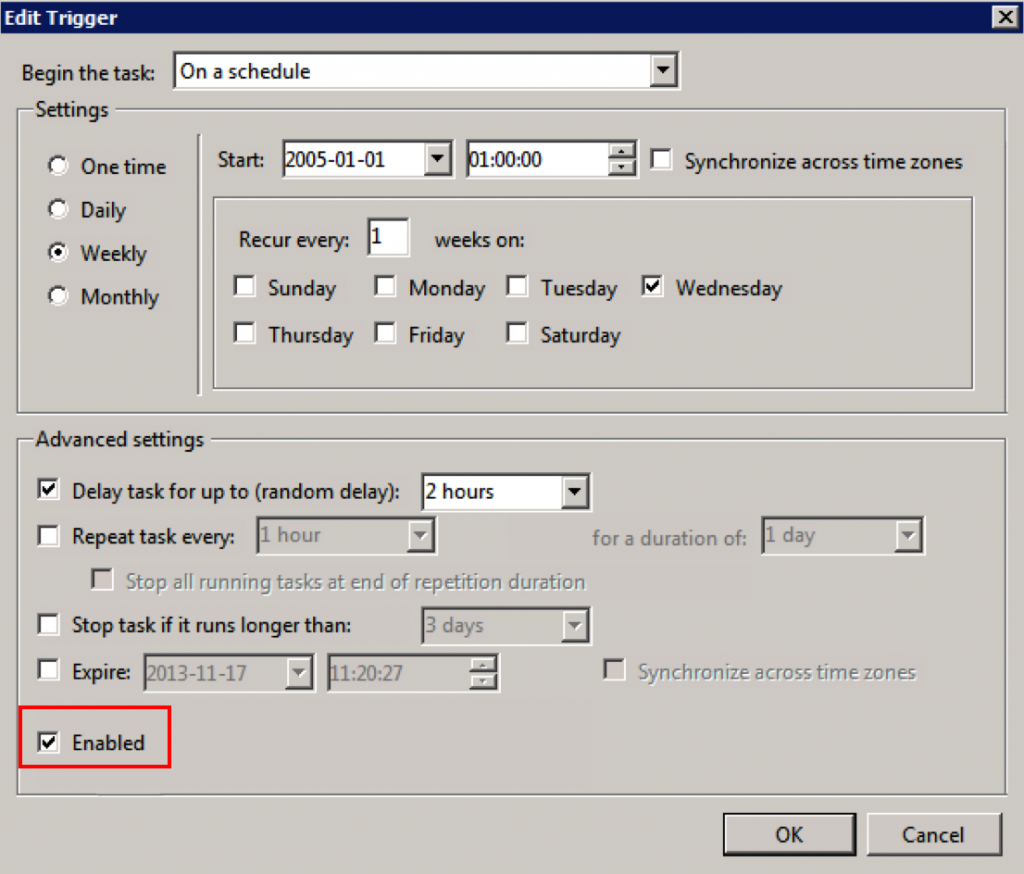
You can then press the edit button and enable the task

Then your task is enabled and on every wednesday at 01:00 the defrag task will be running. As I wrote above, enabling this in a virtualized environment with 100+ VM´s can impact on your storage system quite seriously if all VM´s start to defrag at the same time. One way to mitigate this is to set the start day and start time different on all machines.

Some PowerShell and Windows Hyper-V 2012, find VM´s not connected

Digging around in the powershell module for Hyper-V have given me some ideas on what you can do.

Have you ever wondered about if you have a VM that is not connected to any network?

First you use the script part I showed in an earlier post, how to find Hyper-V servers in your AD :

$VMhosts = Get-ADObject -Filter 'Name -like "*Hyper-V"' | %{$_.DistinguishedName.Split(",")[1].replace("CN=","") }

And then you can run the following to list all VM´s that are not connected to any virtual network

$VMhosts | %{ Get-VM -ComputerName $_ | Get-VMNetworkAdapter | where SwitchName -eq $null}

In this little screendump you can see for all my Hyper-V hosts what VM´s without a network connection, you can also easily change the -eq $null to a switch name and then get what VM´s are connected to that particular virtual switch on all your hosts

good luck 🙂


My sessions on TEC 2012 with PowerShell and Mythbusting

Today I was giving my last session on the Technology Experts 2012 in Barcelona. It has been a really good conference and networking. There could have been more attendees in our virtualization track though. I got much good information from the other speakers and they now their stuff!

Here are the other speakers and links to their blogs and twitter accounts:

Aidan Finn aka @joe_elway  (MVP Virtual Machine)

Didier van Hoye aka @WorkingHardInIT (MVP Virtual Machine)

Carsten Rachfahl aka @hypervserver (MVP Virtual Machine)

Hans Vredevoort aka @hvredevoort (MVP Virtual Machine)

Scott Herold aka @vmguru (VMware vExpert)

Mattias Sundling aka @msundling (VMware vExpert)

My first session was about How to handle Hyper-V 2012 with Powershell,

I showed the attendes some nice ways to deploy your virtualization environment, and I also showed how to get yourself locked out in the Active Directory and getting back in, my post done with win server 2008 r2 is still valid for the win 2012

Here is my powershell file with the different powershell scripts I showed. When I get home from Barcelona I will upload my video demo and do an update post with that link so you can see my deployment

TotalKonf.ps1


And my second session was about mythbusting

The myths i took up was :

  • Core mode
  • Hyper-V used for test/dev
  • AD Dependent Cluster
  • VM time sync
  • VHD Shrink
  • Snapshots
  • Operating systems
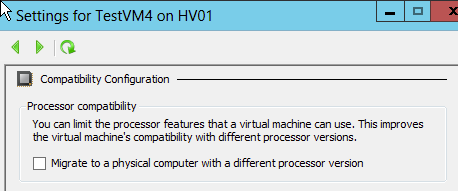
And we had some good discussions in the session. I showed that when you want to run Win NT on Win 2012 Hyper-V you can only use powershell to set the flag for CPU old operating systems, Microsoft has removed this setting from the GUI

And as you can see in my screendump you use Set-VMProcessor cmdlet

Get-VM testvm -ComputerName HV01 | Get-VMProcessor | Set-VMProcessor -CompatibilityForOlderOperatingSystemsEnabled $true

Hope to see you next year on TEC 2013!

Raiders of the lost VM´s in Hyper-V 2012 Cluster nodes

Inspired by Indiana Jones, I have made a little Powershell function to search cluster nodes for VM´s that has not been cluster enabled. If you create a VM in the Hyper-V manager or the Hyper-V powershell cmdlets, the VM is not highly available by default, even if you added it to a SMB share.

What do I do then, I only use one parameter and that is the cluster name, from this I get the HA – enabled VM´s and then check them for all VM´s registered on the hosts. After this I do a comparison and get a list of the VM´s objects that are not Cluster enabled, this can be pipelined to Add-VMToCluster cmdlet (an alias for Add-ClusterVirtualMachineRole) and you are home safe :-). Of course there might be situations where you want a VM to reside only on one cluster node and not be highly available, Guest Clustering is one case where this might be a reason to not add them to a cluster. And if the VM has the configuration and storage locally you wont be able to add it to the cluster anyway

I can easily with PowerShell get the VM´s that are already HA enabled, but with this command I do not get the other VM´s on the cluster nodes.


Get-VM -ClusterObject (Get-ClusterResource -Cluster hypcl30 | where ResourceType -eq "Virtual Machine")

So if I want to get only the VM´s not cluster enabled, here is the function

<#
.Synopsis
   This function search the hosts for VMs tha are not HA enabled
.DESCRIPTION
   This function lets you find what VM´s that is running on your hosts and not activated on the virtual machine role on the cluster
.EXAMPLE
   Get-VMNotInCluster -Cluster HVCL30
.Link
vniklas.djungeln.se

.Notes
    Author: Niklas Akerlund /20121004
#>
function Get-VMNotInCluster
{
    [CmdletBinding()]
    [OutputType([int])]
    Param
    (
        # Name of the Cluster
        [Parameter(Mandatory=$true,
                   ValueFromPipelineByPropertyName=$true,
                   Position=0)]
        $Cluster
    )
    Process
    {
        $ClusterNodes = Get-ClusterNode -Cluster $Cluster
        $VMsInCluster = Get-VM -ClusterObject (Get-ClusterResource -Cluster $Cluster | where ResourceType -eq "Virtual Machine")
        $VMsTotal = Get-VM -ComputerName (Get-ClusterNode -Cluster $Cluster).Name
        $VMsNotInCluster =@()
       
        foreach ($VM in $VMsTotal){
                if($VMsInCluster -notcontains $VM){
                    $VMsNotInCluster += $VM
                }
        }
        $VMsNotInCluster
    }
}

And here is a screendump of it running


And here is when I enable so that all VM´s are Highly Available

Now I do not have so many VM´s in my test environment but in a production environment maybe you can see the potential of knowing that all VM´s on all Clustered nodes are made HA enabled.

Convert Hyper-V vhd to vhdx and back with PowerShell

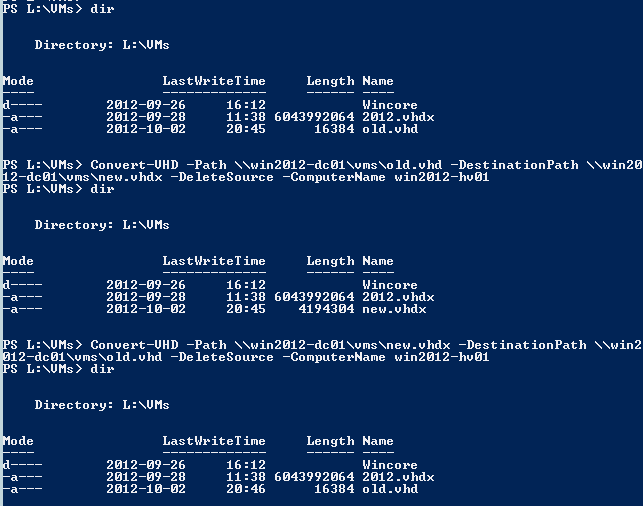
To convert an vhd disk file to vhdx superduper format with PowerShell you just use the cmdlet Convert-VHD (this work only on hyper-v enabled machines). I read Virtual PC Guys post about how to do it in the GUI and wanted to make a small post about how to do it in powershell

Convert-VHD -Path \\win2012-dc01\vms\old.vhd -DestinationPath \\win2012-dc01\vms\new.vhdx -DeleteSource -ComputerName win2012-hv01

And to go back

Convert-VHD -Path \\win2012-dc01\vms\new.vhdx -DestinationPath \\win2012-dc01\vms\old.vhd -DeleteSource -ComputerName win2012-hv01

And here is a screendump

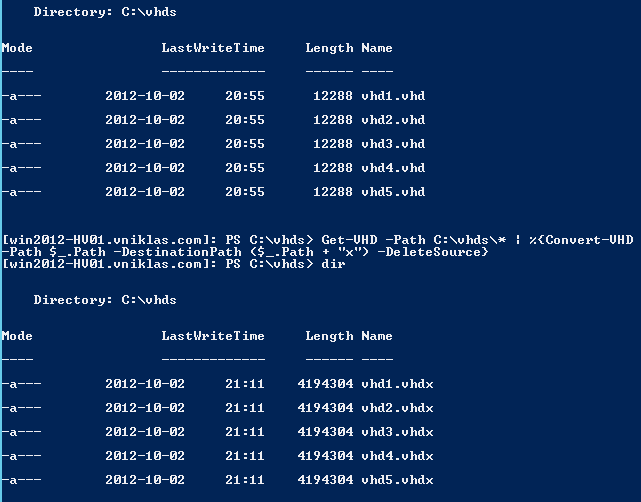
And if I for example want to convert a number of vhd´s

first I create 5 dummy files, of course in the real life you have some files that already are there ready to be converted.

1..5|%{New-VHD -Path .\vhd$_.vhd -SizeBytes 2GB}
Get-VHD -Path C:\vhds\* | %{Convert-VHD -Path $_.Path -DestinationPath ($_.Path + "x") -DeleteSource}

olala look

If you want to convert back to vhd format you need to be sure that it is not bigger than 2040 GB or it will fail. Good luck!

In Windows Hyper-V 2012, Move-VMStorage leaves folders behind

I have tested a bit with the WinServ first in the early version 8 and then RC and now RTM, and what I thought was a bug that MS would fix before RTM seems to be still there.

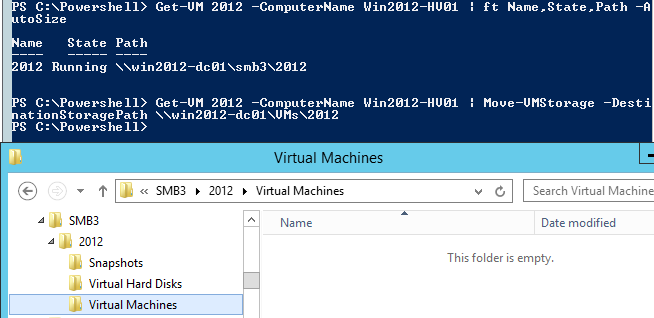
What am I talking about then, well when you do a live or cold storage migration of a VM from for example your local storage to a SMB share either with the gui or preferebly with PowerShell, the built-in function leaves folders behind. And you can see where this is leading when moving a lot of VM´s, several VM´s folders retain with nothing inside and causing confusion!

As you can see on the screendump, the VM 2012 has been moved to another place but the folder still resides with no data in it, the subfolders are there but no disk files. And of course if I use the parameter -RetainVhdCopiesOnSource the folders should stay and also the configuration, vhd files 🙂

So I have done a modified Move-VMStorage function that actually removes the source folder also after moving the VM.

Here is the powershell function and a screendump how it actually deletes the folder also, And as you can see, I check if the VM resides on a share or locally on a hyper-v host and then I use Invoke-Command to delete the folder on the host´s local volume. The script can run on any machine that has RSAT-Hyper-V Powershell tools installed and with an account that has rights to delete folders on the shares/hosts.

<#
.Synopsis
   An updated Move-VMStorage function
.DESCRIPTION
   To also remove the folder where the VM was residing this function also deletes the folder after moving the VM
.EXAMPLE
   Move-VMStorage2 -VM test -ComputerName HV02 -Path \\SMB-srv01\VMs\test
.NOTES
Author: Niklas Akerlund 20120926
#>
function Move-VMStorage2
{
    [CmdletBinding()]
    [OutputType([int])]
    Param
    (
        # A name of a VM or a VM object
        [Parameter(Mandatory=$true,
                   ValueFromPipelineByPropertyName=$true,
                   Position=0)]
        $VM,
        # The name of the Hyper-V host
        [Parameter(Mandatory=$true,
                   ValueFromPipelineByPropertyName=$true,
                   Position=0)]
        $ComputerName,
        # The path where the VM is going to be relocated to.
        [string]
        $Path
    )

        # Lets move and tidy the source folder
        $VM = Get-VM $VM -ComputerName $ComputerName
        Move-VMStorage -VM $VM -DestinationStoragePath $Path
        $VMOldPath = $VM.Path
        if ($VMOldPath.StartsWith("\\")) {
           Remove-Item -Path $VMOldPath -Recurse -Force
        }else{
            Invoke-Command -ComputerName $VM.ComputerName -ScriptBlock {Remove-Item -Path $Using:VMOldPath -Recurse -Force}
        }
        
}

Make sure that you always add the VM´s name to the path otherwise you will put the VM´s folders and files in the SMB folder directly and that will cause a mess and when you run my function it will try to clean that folder and all subfolders wich means all VM´s not running in that folder. Maybe I will add the control that It checks that the path to delete includes the VM name in a future update 😛

Go to the TEC 2012 conference in Barcelona

This year I will present at the Technology Experts Conference by Quest again. Last year I had a session about how to successfully implement and transition into a Hyper-V platform. And this year I will do two sessions in the virtualization track. There are some very skilled speakers listed and I feel proud to be one of the listed.

Mythbusters go Hyper-V 

Maybe not so much explosions as on TV but I will try to in a fun and entertaining way do some mythbusting in the Hyper-V virtualization world. We will go through some of the common myths out there among IT professionals and implementers. Microsoft Windows Hyper-V has gone through a massive facelift from 2008 R2 to the new 2012 with loads of new functionallity and performance. Maybe you still rely on old information about how to set up and configure your virtualization platform. I have put some of the common claims to test and will show if they are myths or true. Watch out for some irony and jokes during the session.

Powershell is the way to handle Windows Hyper-v 2012

In this session we will look at how to manage Hyper-V in the new Windows Server 2012 with powershell and the cmdlets in the Hyper-v Module. We will look at the new functions that have been released in the new Powershell version 3 and how we can use them when deploying and managing the hosts and the virtual machines. We will in this session go from scratch to a fully deployed environment without using the GUI. In the session we will also look at how to find Hyper-V servers in your Active Directory and what VM´s are running there, we will also look at how to schedule a daily health report on your VM´s and hosts.

Hint to save money on registering:

TEC are offering a discounted 850 Euro rate for  delegates who register by 21 September! To receive the discount code, please email TEC2012@quest.com.

Installing vSphere vCenter 5.1 on Windows 2012

I have tested to install the new VMware ESXi 5.1 in a VM on my Macbook pro, next step was to get the vCenter 5.1 working on Windows 2012.

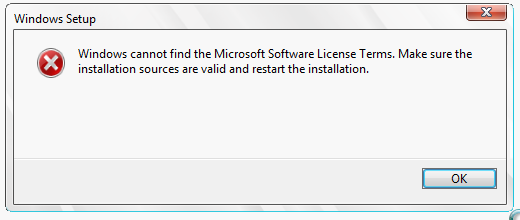
I downloaded the evaluation ISO from technet and when using the Easy Install I got an error trying to install the OS on the VM, as you can see on the screendump I get a licensing error, my first thought was that it was an error with my iso download and I then downloaded it again but the error persisted.

When I try to set up a new VM without the Easy Install I get the license agreement without error and could deploy the VM without any errors. Did I say that I am using the latest fusion 5.0.1

So to continue with the install, when the OS is upp and running I also need to download/install .net 3.5 (this is not by default available in win 2012 so I need the Media or an Internet connection). This as the .Net 3.5 is a requirement when installing vCenter.

Then I run the simple install from the media that will install the vCenter server, Single sign-on and Inventory service together.

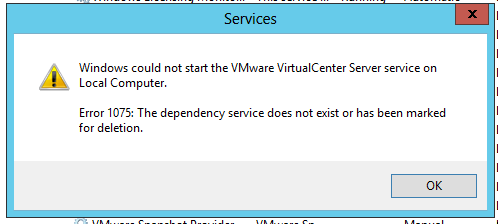
When the installation is finished everything seems to be installed but the vCenter service will not start. It complained about a service that it depended on that was not existing.

I investigated a bit and the Protected Storage Service was deprecated in windows 2008 and only in read-mode and I could not find it for Windows 2012. So I wanted to remove the dependent services.

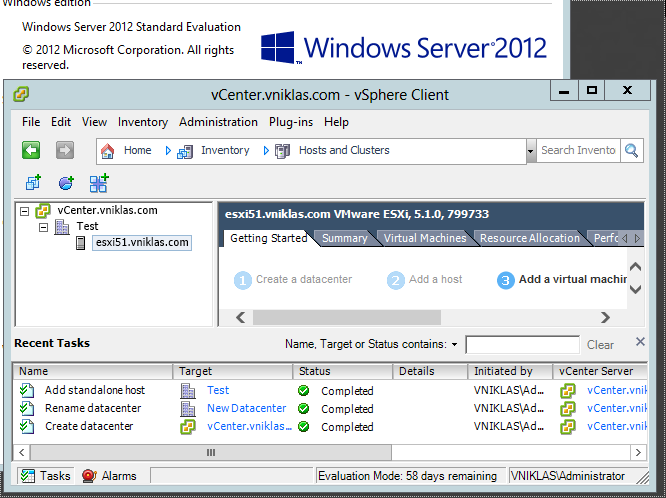
So how to do this, I type sc config vpxd depend= “” to remove all dependencies and then I typed sc start vpxd and the service took a bit to start but eventually it got to a running state.

Then I installed the vSphere Client and tried to log in and when the client opened I added the vSphere host without any issues.

Now when I got this running I will continue to install PowerCLI 5.1 and test it with PowerShell 3.0