Adding 2016 DHCP Scopes with PowerShell in Windows 2012

I have had a lot to do and that is why I have not done so much updating on the blog, soon my third article will be published on Petri IT Knowledge 🙂 I have also attended the MMS in Las Vegas where I got loads of good information and meet lots of people!

In this post I want to show you the improvements in Windows 2012 and with the PowerShell native cmdlets in this version.

The task was to automatically create 2016 DHCP Scopes for clients on a DCHP server and every scope was a /29 net with 3 lease addresses and one router for each.

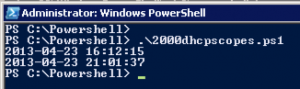
I tested this on a Windows 2008 R2 with the community powershell module  and with the following script it took, and I am not kidding, almost 5 hours!! the module utilise the net sh commands with dhcp and probably there could be a lot of improvements for performance, and seriously, just creating one or two scopes can be done in the gui but doing over 2000 will demand a scripted way!

Screen Shot 2013-04-24 at 19.28.45
# Massive DHCP Scope 2016
#
# Niklas Akerlund 2013-04-24

write-host (get-date)
for($b=1;$b -le 63 ; $b++){
    for($i=0;$i -le 255){ 
        New-DHCPScope -Server localhost -Name 10.10.$b.$i -Address 10.10.$b.$i -SubnetMask 255.255.255.248 | Out-Null
        $startip = $i+2
        $endip = $i+4
        $router = $i+1
        Add-DHCPIPRange -Server localhost -Scope 10.10.$b.$i -StartAddress 10.10.$b.$startip -EndAddress 10.10.$b.$endip | Out-Null
        Get-DHCPScope -Server localhost -Scope 10.10.$b.$i | Set-DHCPOption -OptionID  003 -DataType IPADDRESS -Value 10.10.$b.$router | Out-Null
        $i = $i +8
    }
}
write-host (get-date)

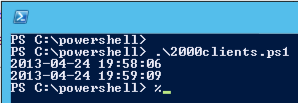
With the PowerShell DHCP module for WIndows 2012 I have created the following script for creating the same amount of scopes and configuration and running it took only about 1 minute!!

Screen Shot 2013-04-24 at 20.02.35
# Massive DHCP Scope 2016
#
# Niklas Akerlund 2013-04-24

write-host (get-date)
for($b=1;$b -le 63 ; $b++){
    for($i=0;$i -le 255){ 
        $startip = $i+2
        $endip = $i+4
        $router = $i+1
        Add-DhcpServerv4Scope -Name 10.10.$b.$i -StartRange 10.10.$b.$startip -EndRange 10.10.$b.$endip -SubnetMask 255.255.255.248
        Set-DhcpServerv4OptionValue -ScopeId 10.10.$b.$i -Router  10.10.$b.$router
        $i = $i +8
    }
}
write-host (get-date)

As you can see, handling lots of changes and configurations can easily be done in the new Windows 2012 and it´s native cmdlets!

Manage your Clouds with PowerShell ppt and demofiles

Today I was presenting on the Technet Sweden Live meeting:System Center Sp1 Springtime series and my session was about:

manageclouds


The presentation can be downloaded on the following link -> SC2012SP1VarenPSClouds and I have also added it to slideshare

I also promised that the powershell files I have created for the demonstrations would be downloadable and here they are, I have made one file for each of the cloud management parts

You can also read some of my other posts about App controller and how to add clouds to it, also the post about how to extend your VMM console with custom properties and also how to download and update help in SCVMM.

I will try to get some time to make some demo movies and publish them in a near future 🙂


Not able to set HA on a running VM with SC VMM 2012 SP1

I have described before in blog posts about how to add a running VM to a Hyper-V failover cluster with the PowerShell cmdlets without moving it or turning it off, asuming it already was on a highly available storage such as a CVFS volume or smb 3.0 file share

In my exploration of the virtual machine manager PowerShell module I wanted to test and see if this was also possible in there but I do not succeed, or more correctly maybe should be noted that the SCVMM team has not implemented that for this release 🙁 what has been implemented is the possibility to make a VM highly available when moving between datastores on a cluster node or from a single hyper-v host to a cluster node. As there is some copying of data it will also take longer time than the below command.

In Hyper-V with failover cluster PowerShell module I can add a VM to the cluster with the following cmdlets without stopping the VM.

sethighavailpshv
Hyper-V\Get-VM vmtest -ComputerName HV02 | Add-VMToCluster -Cluster HVCL30

As you see, the reason why I have added the Hyper-V to the cmdlet is that because in the VMM PowerShell cmdlet there is an alias that is called Get-VM and refers to the Get-SCVirtualMachine and that conflicts with the Hyper-V PowerShell module´s Get-VM and I have imported both modules in the same console. I have also imported the failover cluster module in the same console.

If I try to use the Set-SCVirtualmachine vmtest -HighlyAvailable $true I get the following error.

sethighavailvmm

In the VMM Console this option is also greyed out and cannot be set.

isavailablegui

Here is the command to move the VM from one datastore to another and in the same time making it highly available,

movevmworks

I have made a blog post about the issue with Move-SCVirtualMachine not updating the cluster resource and this can be a way to handle this but in my opinion a far more complicated way as you have to move the VM to a new datastore and removing the high availability and then moving it again to another datastore and making it high available again, with a large virtual machine this can take some considerable time when it otherwise just is to run the cluster cmdlet.

Adding Clouds to SC App Controller 2012 SP1 with PowerShell

Last post I did was about how to get the connection to an remote SC App Controller Server with the SCAC PowerShell module.

Now I will show you how to add your Private and Public Cloud to your App Controller with the PowerShell cmdlets.

First off I will add my SC VMM server, and as you can see I first connect to the App Controller and then add the VMM server.

AddVMM

I do not know if it is my silverlight that has some issues or, but the web console did not reflect the addition of the VMM Server until I logged of and then on the App Controller portal

VMMingui
PS C:\> Add-SCACCloudSystem -VMM -Name VMM2012 -ServerName vmm2012.lumademo.local -Port 8100

Then I will add my Azure account and that is done by adding an subscription, here you will need the certificate with the private key for the management certificate that you uploaded to your Azure subscription. And yes I have cluttered out the password and subscription Id in the screendump so it is not your monitor that broke 😉

AddAzure
Azuregui
PS C:\> Add-SCACAzureSubscription -Name vNiklas -Id your-azure-subscription-id -ManagementCertificatePath C:\temp\certazure.pfx -ManagementCertificatePassword (ConvertTo-SecureString -AsPlainText "YourCertPassword" -Force)

Pretty easy and now I have two clouds in my App Controller, I can also add a SPF cloud connection from a third party vendor to get a truly hybrid cloud, that I have not set up yet though so it will have to be in another post.

Using SC App Controller 2012 SP1 PowerShell module remote

Today I have been exploring the System Center App Controller 2012 SP1 and the PowerShell module that it has.

There is not so many cmdlets in this but maybe it is enough… will find out soon 🙂

Screen Shot 2013-03-26 at 20.55.51

One cmdlet that is necessary is the Get-SCACServer if you are running the powershell module remote. Here comes the small problem when like me not using a certificate from a trusted CA like the AD CS or bought by a small amount of $$$ from verisign or other vendor of certs. As you can see on the next screendump I get a small error that the cmdlet does not like the certificate, well as there is no -force parameter on the cmdlet I went for another aproach and I added the self-signed cerificate from the App Controller server that was used in the IIS to the trusted root certificate authorities certificate store in the cert manager on the Management machine where I wanted to run the appcontroller PowerShell module. And now the cmdlet did not complain and I could get the App Controller server 🙂

Screen Shot 2013-03-26 at 21.43.22

Here you can see where I added the cerificate,

Screen Shot 2013-03-26 at 21.59.48

When using the App Controller PowerShell module locally on the same server as the App Controller Server resides this trust of the cert is already taken care of 🙂

A good post on how to create your own certificates for example using in management of your Azure or your IIS SSL you can find here on this link.

Downloading help for SC VMM 2012 SP1 PowerShell module

Today I wanted to use the help in SC Virtual Machine Manager PowerShell console and found that I had to download the updated help before I could see the whole, and of course I tried to do that but encountered the little error that follows in the screendump as you see,

Screen Shot 2013-03-25 at 10.35.55

I had used the PowerShell shortcut in the VMM Console, and was using my own login account, It is part of administrators/domain admins but still had not proper rights on the VMM server.

Screen Shot 2013-03-25 at 19.59.53

I opened a new PowerShell console by right click on the shortcut on the taskbar and chose Run-As Administrator and typed:

Screen Shot 2013-03-25 at 20.03.07
Import-Module virtualmachinemanager
Update-Help -Module virtualmachinemanager

And now I can see the full help 🙂

Screen Shot 2013-03-25 at 19.56.52

New book : Windows 2012 Hyper-V Install and Configuration Guide

HypVConfgInstallgd

Today I bought this book that is written by

  • Aidan Finn
  • Patrick Lownds
  • Michel Luescher
  • Damian Flynn

And in part one I found that Aidan had referred to one of my scripts for moving virtual machine storage without leaving anything behind,

cleaningvNiklas

since the book got into production I have made an update to do some checking and not deleting to much that could happend in the first version!

I feel really honored to be included within a such complete and thorough book about Hyper-V in Windows 2012!

It takes som extra days before it is going to start being delivered in Europe but You can as I by it directly from the Amazon US Kindle store and get it delivered to your App on a chosen device.

Failover Cluster not updated after vm storage migration in VMM 2012 SP1

I was talking to a customer today about an issue they had with their SC VMM 2012 SP1 and when they where doing some storage migrations between their CSV SAN volumes in the Hyper-V cluster.

Screen Shot 2013-03-19 at 22.24.56
Move-SCVirtualMachine -VM (Get-SCVirtualMachine VMtest) -VMHost (Get-VMHost HV02) -Path "C:\ClusterStorage\Volume2" -UseLAN

Everything looks good inside VMM and also the VM works nicely but when looking at the failover cluster manager the resource is not updated which resulted in failure in backup with DPM and probably more issues.

Here is a screendump of the VM in failover cluster manager and also an screendump of the VM in VMM after the migration, as you can see these values does not match

Screen Shot 2013-03-19 at 20.24.47
Screen Shot 2013-03-19 at 20.57.09

There is a way to solve this but that will mean that we have to use the failover cluster and Hyper-V cmdlets. Also should be noted that if we use the failover cluster manager it works so it is a bug in VMM.

So I opened a new PowerShell console and typed the following:

Get-VM VMtest -ComputerName HV02 | Update-ClusterVirtualMachineConfiguration -Cluster HVCL30

And here you can now see that the cluster resource reflects the right data

Screen Shot 2013-03-19 at 22.40.42

There is actually one more solution and that is to remove the VM from the cluster and then add it again but it is easier to just update the cluster virtual machine configuration 🙂

On the management computer I always install the RSAT tools for Hyper-V and also Failover Cluster along with the VMM console to be able to do all management from one place even if I cannot do it all in VMM.

SCVMM 2012 SP1 VM Network Name missing issue

Today when I was going to test the P2V functionality of the VMM 2012 SP1 I found a strange issue.

walking through the wizard for the p2v migration, it gave me an error that I first did not understand, but as it did not allow me to continue the wizard I had to start searching. Based on the object name VMNetwork I concluded that it probably had something to do with the VM Networks.

vmmp2verror

Using PowerShell with the VMM module and the cmdlet Get-SCVMNetwork gave me the following error, and that did not look so good, it should be working right?!

errorvmmpsnet

And looking in the VMM console over the VM networks showed me the following, and yes it is not possible to create a VM Network that has no name but somehow it had happend in my system!

beforevmnetworkconsole

When I restarted the VMM Console the whole list was empty so surely the system did not like this..

So how did I fix it? As all data except the library files are stored in the VMM database I went in there. Here is an excellent place for a reminder for you guys out there that not yet have set up any backup for your VMM servers and particularly the DB, DO IT!

Now my system is a test/lab so if I would break it there is no production systems that will be dependent of any errors or failures.

To be on the safe side I stopped the VMMService before I edited the database and that of course with PowerShell:

stopvmmsrvc

And when that was done I opened the SQL Management Studio and expanded the VMM database, they have a good best practice in naming the tables so it did not take so long time for me to find the one that I wanted to edit, in this case dbo.tbl_NetMan_VMNetwork , right click and chose the edit top 200 rows (if you have more than 200 vm networks you will have to do a query instead 🙂 )

editdbtable

And as you can see on the rows in this table there is one that has in a mysterious way gone blank on the name field, I edited it with the name “Internal” as that was the name I had before and then hit Enter, closed the table and then I started the VMMService again.

editdbtablerow

And in the VM Networks view of the VMM Console everything was back to normal again:

backtovmnetworkconsole

Now I will look at some logs and try to find out why the VM Network´s name disappeared in the first place 🙂

Updated Move-VMStorage2 function for Hyper-V PowerShell

I have been updating my function that extends the Hyper-V PowerShell module cmdlet Move-VMStorage. A while ago I made a blog post about that I think that the folders on the source directory should be removed when doing a Live Storage Migration or you will get a mess with empty VM folders after a while and that can cause some confusion for the admins.

The updates in this script function are the following:

  • I will not delete folders if they do not reside within a folder with the VM´s name (In the earlier version I just deleted and that recursive with no questions asked which could have some consequences )
  • And if the folder was the default or named with another name you will get an output that tells you to clean manually
  • If you do not give the VM´s Name in the -Path parameter I will add that for you to get a nice and tidy folder structure

Here is a screendump on the updated function in action

move-vmstorage2

And here you can see what happens if I move from a folder that is not named after the VM´s name

manuallyclean

And here is a screendump of the folders that are left in the c:\vms that you need to manually delete and you might want to check that not another vm is residing inside these folders before removing them 😛

foldersbehind
    <#
    .Synopsis
       An updated Move-VMStorage function
    .DESCRIPTION
       To also remove the folder where the VM was residing this function also deletes the folder after moving the VM
       This function also helps you in creating a folder in the path if forgotten
    .EXAMPLE
       Move-VMStorage2 -VMName test -ComputerName HV02 -Path \\SMB-srv01\VMs\test
    .NOTES
    Author: Niklas Akerlund 20130226
    Version: 0.2
    #>
    function Move-VMStorage2
    {
        [CmdletBinding()]
        [OutputType([int])]
        Param
        (
            # A name of a VM
            [Parameter(Mandatory=$true,
                       ValueFromPipelineByPropertyName=$true,
                       Position=0)]
            $VMName,
            # The name of the Hyper-V host
            [Parameter(Mandatory=$false,
                       ValueFromPipelineByPropertyName=$true,
                       Position=1)]
            $ComputerName = "localhost",
            # The path where the VM is going to be relocated to.
             [Parameter(Mandatory=$true,
                       ValueFromPipelineByPropertyName=$true,
                       Position=2)]
            [string] $Path
        )
    
            # Lets move and tidy the source folder
            $VM = Get-VM $VMName -ComputerName $ComputerName
            # For some reason the path does not get refreshed when moving one VM several times in the same console that is why i do a select *
            $VMOldPath = Get-VM $VMName -ComputerName $ComputerName | select * -ExpandProperty Path 
                    
            if ($Path -notmatch $VM.VMName){
                $Path = $Path + "\" + $VM.VMName
                Move-VMStorage -VM $VM -DestinationStoragePath $Path
            }else{
                Move-VMStorage -VM $VM -DestinationStoragePath $Path
            }
            
            if (($VMOldPath.StartsWith("\\")) -and $VMOldPath -match $VM.VMName) {
               Remove-Item -Path $VMOldPath -Recurse -Force
            }elseif ($VMOldPath -match $VM.VMName){
                Invoke-Command -ComputerName $VM.ComputerName -ScriptBlock {Remove-Item -Path $Using:VMOldPath -Recurse -Force}
            }else{
                Write-Host "The VM :" $VM.VMName " was in the following path " $VMOldPath " Clean it manually!"
            }
            
    }