Today I have been at a customer and helping them in a SC VMM issue where the VM went missing during a storage migration from one CSV volume to another. We are working on a project to upgrade this environment from Hyper-V 2008 R2 Sp1 to 2012 and VMM 2012 SP1 but this issue is from the VMM 2012.
On the vm there were three avhd files from snaphots taken at different times and the files was quite big.. the virtual machine original vhd was 53 GB and the snapshot differencing disks where about 40 GB each. So quite a bit of data to merge. The customer removed the snapshots but was a bit too eager to start the move so the vm had not merged the snapshots files before they started the migration.
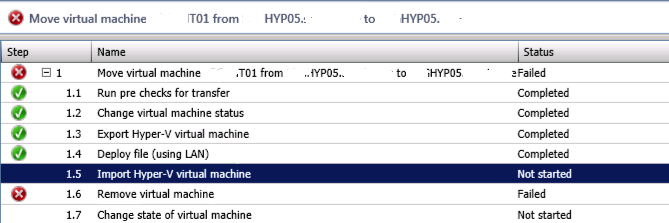
During the migration the VMM server lost connection for a very short moment to the host and the result was that the vm got missing in the VMM console and also in the Hyper-V manager. The job had removed the VM´s configuration file but not moved it to the new location so what was left in the virtual machine folder was just the vhd and avhd files.
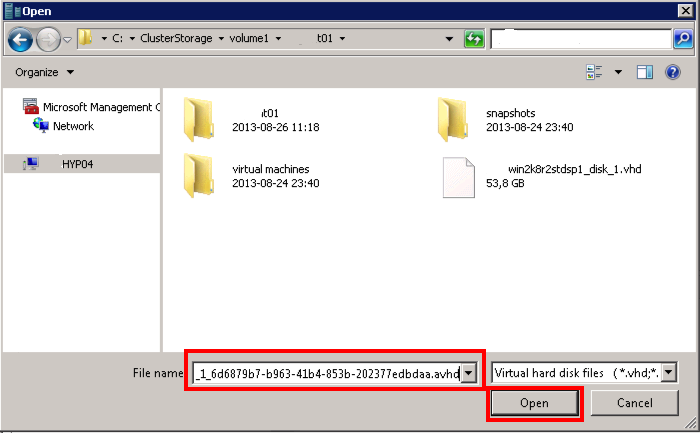
To find which avhd file that was the latest and find the snapshot-chain we used the “inspect disk” and “inspect parent” in Hyper-V manager, in Win 2008 R2 Sp1 it does not show the avhd file by default so you have to copy and paste the file name and then it works. As the files was in a merge process it was not obvious which file was the latest, in a normal case it is quite obvious to see in the date properties of the avhd files.
When we found which was the right avhd file we created a new VM and attached the avhd file, same procedure as with the inspect disk, copy and paste the file name in the field. If you would take the wrong avhd file and start the VM the differencing chain would break and all changes in the files after would be lost!
Now We could start the VM and verify that we got all data until the latest snapshot and that the customers user not had lost any data! As it now was a new VM with a new network card we had to enter the IP settings on that network connection.
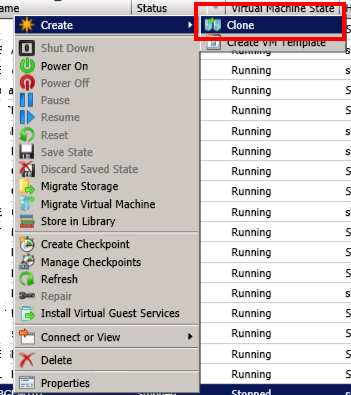
The easiest way we thought of to get the VM to merge the avhd´s was to use the “Clone” feature in the VMM console.
And when the clone of the VM was finished that job had also merged the disks and the virtual machine started without any errors and avhd files 🙂
I have said it before and will emphasize it again, do not use snapshots as backup solution and remove them as soon as you are done as they do impact on performance !
I look forward to when we have the environment on hyper-v 2012 where the live-merge feature exist and also later the R2 feature with the live clone!
Today I have been working with Azure and the disk size. In our lab environment we started out when the Azure Iaas role was still in preview and it had a limit that not until now have appeared as a problem. The system VHD in the preview version was only 30 GB and now when the c:\windows\winSxS folder has grown with patches and install files to about 14 GB the volume is beyond full :-/ and yes the SQL service running on the server is installed on another partition..
The different options on how to do an resize of an disk in an Azure Iaas VM when doing a search is quite cumbersome but I found this guy Maarten Balliauw that made a console app that can fix the stuff and this without installing new VM´s or downloading the VHD.
Now to test how to do it I created a new VM and this get a OS disk with 127 GB and I wanted it to be 30 GB so I had to shrink it. The binary that Maarten have does not include the latest addition with the shrink option, so I asked my colleague to compile it for me as I do not have Visual Studio installed (at least not yet), Thank you Tim!
UPDATE -> Download Tims compiled binary here : shrinkAzure
So to do a shrink with the latest source and a friend with a compiler.
Shrink the partition with powershell or disk management tool (if you do not the OS partition will be corrupt if shrink the vhd beyond this)
Shutdown the VM
Delete the VM -or- detach the disk if it’s not the OS disk
Delete the cloud service if you have created it to be able to create a new with the same name
In the Windows Azure portal, delete the disk (retain the data!) do that the lease Windows Azure has on it is removed
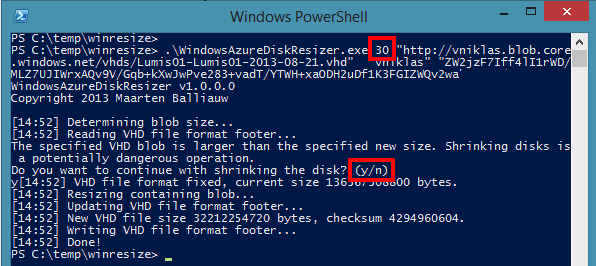
Run WindowsAzureDiskResizer
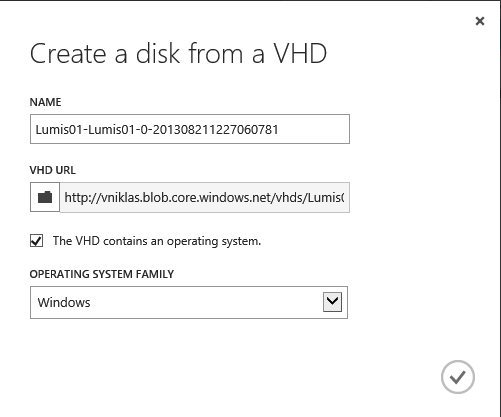
In the Windows Azure portal, recreate the disk based on the existing blob
Recreate the VM -or- reattach the disk if it’s not the OS disk
Start the VM
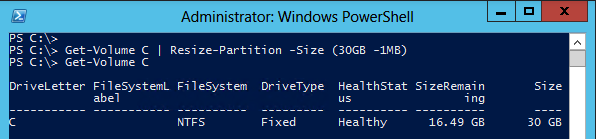
So I start shrinking the volume inside the Azure VM. As you might notice I have shrink it to just below 30 GB (30GB -1MB)
And then I have a volume that looks like this in the disk manager
Next step is to delete the VM and also the delete the disk (retain data) and as Maarten says I can then use his tool, if I do not delete the disk from the Iaas it will fail. And here I enter 30 GB disk size, and if I would not have done the volume just 1 MB below 30GB I get a corrupt OS volume, the tool does not check the volumes inside the VHD..
Of course I could have done a VHD size of 31 GB but this was just for testing and seeing what happens.. I did also remove the Cloud Service so that I could use that name after I was done to get the old url to the new VM.
Now it is time to re-create the virtual disk and then the virtual machine..
And then when I started the virtual machine and connect to it, the size of the disk is 30 GB
I am looking forward to the day that Azure runs on Windows 2012 R2 Hyper-V and the VM´s in the Iaas role can be configured with Gen2 and you can change the vhdx size on the fly when the VM is running 🙂
Today I was on Sommarkollo at Microsoft Sweden and speaking on the event and this was the last of two sessions about the MAT (Migration Automation Toolkit).
This automation tool that I first got to know about at MMS 2013 in Las Vegas (sadly it looks like there will be no more MMS 🙁 but that is another story ) in the session held by “Migration Mark” and Matt McSpirit WS-B325 and there in the video about 41 minutes into I ask about how the MAT take care of IP addresses on the migrated VM´s and they answered me that is not part of the MAT yet! And well I would say that this would be quite painful to migrate 100-200 VM´s with this automation tool and still have to enter IP settings for each migrated vm manually!!
But I have an example on how that can be done, I have not integrated it into the MAT scripts yet but it automates the collection of not just the IP addresses but also dns,subnet and gateway.
The information is available via the PowerCLI from the vCenter and here I show you how you can collect all that info after you have got the migration list
Here you can see the csv file after it has run in my test environment, one thing that I will extend with after discussing with some folks is the vlan number the port group the vm is connected to so that can be configured on the other side also.
And then I also with the possibility that there is in Hyper-V 2012, configure the network on the guest from the host, this requires that the virtual machine has the latest integration components installed. Ravikanth has done a blog post about how his function, I have added the possibility to run it from a remote computer
And here is the script that I run to configure the VM´s after the MAT has done the conversions, and yes as Mark says about MAT, there is room for improvements here also of course, As you can see I start with injecting the latest integration components into the VM, the sleep cmdlet is used to get the vm fully booted and integration components installed and then an reboot inside the VM.
# Configure and set VM after Conversion
#
# Niklas AKerlund / 2013-07-01

# Function import
. .\Set-VMNetworkConfiguration.ps1

$VMNICs = Import-CSV -Path D:\mat\vmniclist.txt -Delimiter ";"
$ConvertedVMs = Get-Content -Path D:\mat\VMlist.txt

# Configure each vm before starting
foreach ($ConvertedVM in $ConvertedVMs){
    $VM = Get-VM $ConvertedVM.Split(".")[0]
    write-host $VM.Name
    #patch each VM with latest Integration Tools
    $virtualHardDiskToUpdate =($VM | Get-VMHardDiskDrive).path
    $integrationServicesCabPath ="C:\Windows\vmguest\support\amd64\Windows6.x-HyperVIntegrationServices-x64.cab"

    #Mount the VHD
    $diskNo=(Mount-VHD -Path $virtualHardDiskToUpdate –Passthru).DiskNumber

    #Get the driver letter associated with the mounted VHD, note this assumes it only has one partition if there are more use the one with OS bits
    $driveLetter=(Get-Disk $diskNo | Get-Partition | where Size -GT 100MB).DriveLetter

    #Check to see if the disk is online if it is not online it
    if ((Get-Disk $diskNo).OperationalStatus -ne 'Online'){Set-Disk $MountedVHD.Number -IsOffline:$false -IsReadOnly:$false}

    #Install the patch
    Add-WindowsPackage -PackagePath $integrationServicesCabPath -Path ($driveLetter + ":\")

    #Dismount the VHD
    Dismount-VHD -Path $virtualHardDiskToUpdate

    Start-VM -VM $VM

    Start-Sleep -Seconds 300

    # Wait for the Integration components being installed and the server reboot (reboot requires interaction or automatic script inside VM or you will have to do an unclean poweroff

    Start-VM -VM $VM

    # check that the migrated VM actually has ic that responds
    do {
        $notok = Get-VMIntegrationService -VM $VM | Select -First 1 | where PrimaryStatusDescription -eq "OK"
    } while( $notok -eq $null)

    # COnfigure NICs
    foreach ($VMNic in $VMNICs){
        write-host "Configuring"
        if($VMNIC.VMName -eq $VM.Name){
           if(!(Get-VMNetworkAdapter -VM $VM)){
               $VMNetAdapter = Add-VMNetworkAdapter -VM $VM -SwitchName $VMNic.NetworkName -Passthru
               $VMNetAdapter | Set-VMNetworkConfiguration -IPAddress $VMNic.IP -DefaultGateway $VMNic.GW -Subnet $VMNic.SubnetMask -DNSServer $VMNic.Dns -ComputerName HV03

           }else {

               Connect-VMNetworkAdapter -VMName $VM.Name -SwitchName $VMNic.NetworkName
               $VMNetAdapter = Get-VMNetworkAdapter -VM $VM
               write-host "connecting $VMNic.NetworkName "
               $VMNetAdapter | Set-VMNetworkConfiguration -IPAddress $VMNic.IP -DefaultGateway $VMNic.GW -Subnet $VMNic.Subnet -DNSServer $VMNic.DNS -ComputerName HV03
          }
        }
    }

}
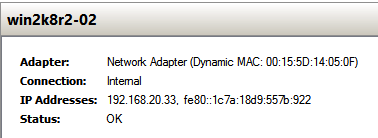
And after running as you can see in the Hyper-V manager I have the right IP on the VM (and if you check inside the VM, you will see that the dns,subnet and gateway also has been set correctly.
Today I have successfully migrated a Generation 1 VM with Windows 2012 standard to a Generation 2 VM on a Windows 2012 R2 Hyper-V host. This involved a third party software from Vision Solutions called Double-Take Move.
What I did was installing a Windows 2012 on a Generation 1 VM and updated to the latest integration components. I configured a static IP, changed server name and added it to the domain. Then I also added some files and installed the Web Server role with a custom webpage to see that the service responded after the fail-over.
Last step was to install the Double-Take Move software.
And for the target I created a Generation 2 VM and installed Windows 2012 and also here updated to latest integration components. In this VM I only installed the Double-Take Move software. The VM was configured with DHCP and no domain join.
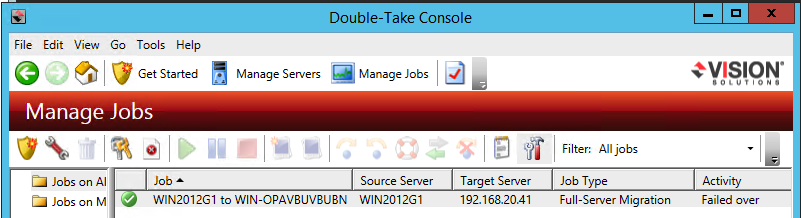
Then It was time to create a Move-Job and after a full sync I could do a failover:
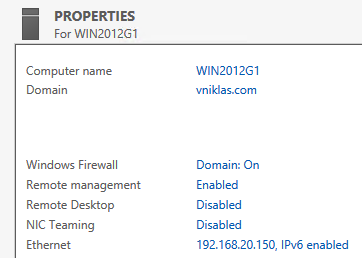
And as you can see on the following screendump, the Gen2 VM have got the right settings. And of course my web page responded as expected!
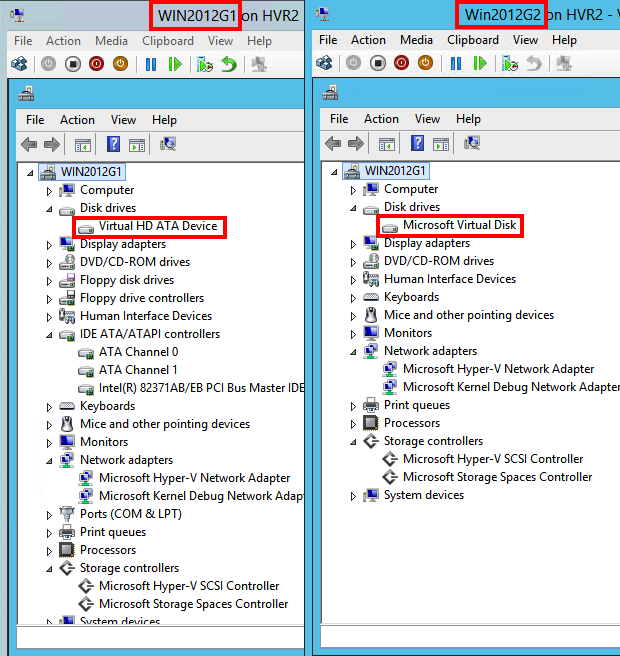
And here is a comparison on the device manager between the two and as you can see that the IDE is gone in the G2.
The Double-Take Move is a powerful tool and it requires a license to work. They also have integration with System Center VMM and Orchestrator to automate a large scale migration. Now I just tried to migrate inside a hyper-v host between two VM´s but I could have done a migration from a VMware environment or a physical server instead :-).
After working a lot with NetIQ Platespin Migrate (which has unfortunately been lagging behind in the development and support for newer os) I now have a positive experience of the Double-Take software and the easy to use and start migrating!
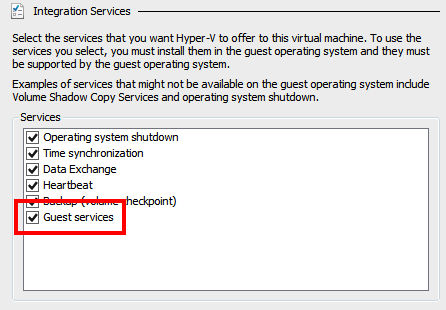
Today I have been exploring a bit in the Windows 2012 R2 Preview and when looking in the technet article “What´s new in Hyper-V 2012 R2” I found the interesting part with the new Integration Service “Guest Services” that allows moving files from the host to the virtual machine without any network connectivity.
This requires two things, first that the “Guest Services” integration component is activated in the VM settings and also that the virtual machine has the latest integrational components installed and the “Hyper-V Guest Interface” service running.
When creating a new virtual machine this is not enabled but I have noticed that when you install Windows 2012 R2 inside the Virtual Machine it gets enabled somehow during the installation, both good and bad… Maybe you want to have some control on what VM´s get this enabled, this can however be a Preview “bug” and will change when the R2 is RTM.
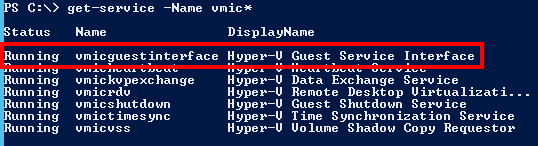
Inside the VM the following Service is running and makes it possible to move files to the VM from the Host. Note that even that you can run the powershell cmdlet from a remote server that have the Hyper-V RSAT tools installed you will have to put the file/files you want to transfer to the VM on the host!
With the parameter -CreateFullPath the folders will be created that I have in the -DestinationPath inside the VM.
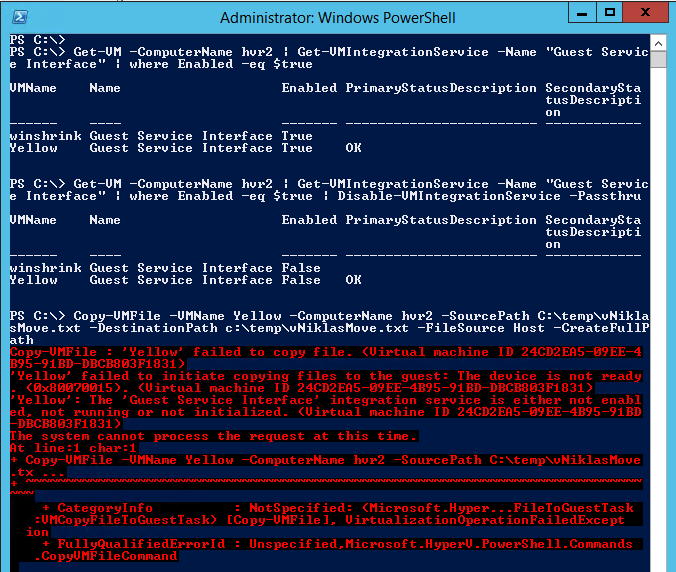
If you want to check what VM´s have this Integration guest service enabled you can check it with PowerShell and also disable it and only enable on a per VM basis when transferring files.
Get-VM -ComputerName hvr2 | Get-VMIntegrationService -Name "Guest Service Interface" | where Enabled -eq $true | Disable-VMIntegrationService -Passthru
And on the following screendump you can see that after disabling this I cannot transfer files to the VM.