Move VMs from an old storage array to a new using powerCLI

I have after reading a tweet written the simplest script for a SAN exchange, my script just look for the VMs associated with one datastore and storage vmotion them to an new datastore with no downtime 🙂 of course this requires Enterprise or higher in your vSphere licensing.

I have done some assumptions that there is equally many datastores provisioned in the new as the old and that no VMs have RDMs and vmdk on several datastores.

The Get-Datastore cmdlet can filter using wildcards like *c2* if your naming convension is complex and you need to find your old/new datastores objects.

For each old datastore i wait 30 minutes before starting on the next, maybe this must be set a bit higher depending on how long the storage vmotion takes and how large the datastores/vmdk´s are. Maybe we should put a sleep after starting move of each VM?! I have not yet had the pleasure testing in a large environment yet..

# Move VMs to new datastore using SVMotion
#
# Niklas Akerlund /RTS
#

# I want all old and new datastores as objects in arrays
$OldDatastores = Get-Datastore vmfs-volumes-old0*
$NewDatastores = Get-Datastore vmfs-volumes-new0*
$i = 0

# Get all VMs in each old datastore and move them
Foreach ($OldDatastore in $OldDatastores){
	$VMs = Get-VM -Datastore $OldDatastore
	
	Foreach ($VM in $VMs)
	{
		# Move the VM to a new datastore
		$VM | Move-VM -Datastore $NewDatastores[$i] -RunAsync
		
	}
	
	$i++
	# we want to give the SVMotions a little time before taking the next datastore 
	Start-Sleep 1800
}

I would recommend testing on a single datastore or a few VMs and when feeling comfortable running on all datastores..
HTML report checking your vSphere host configuration by powerCLI version 0.1

I have today started creating a script that is sort of a check that when installing new hosts, all of them are configured the same.

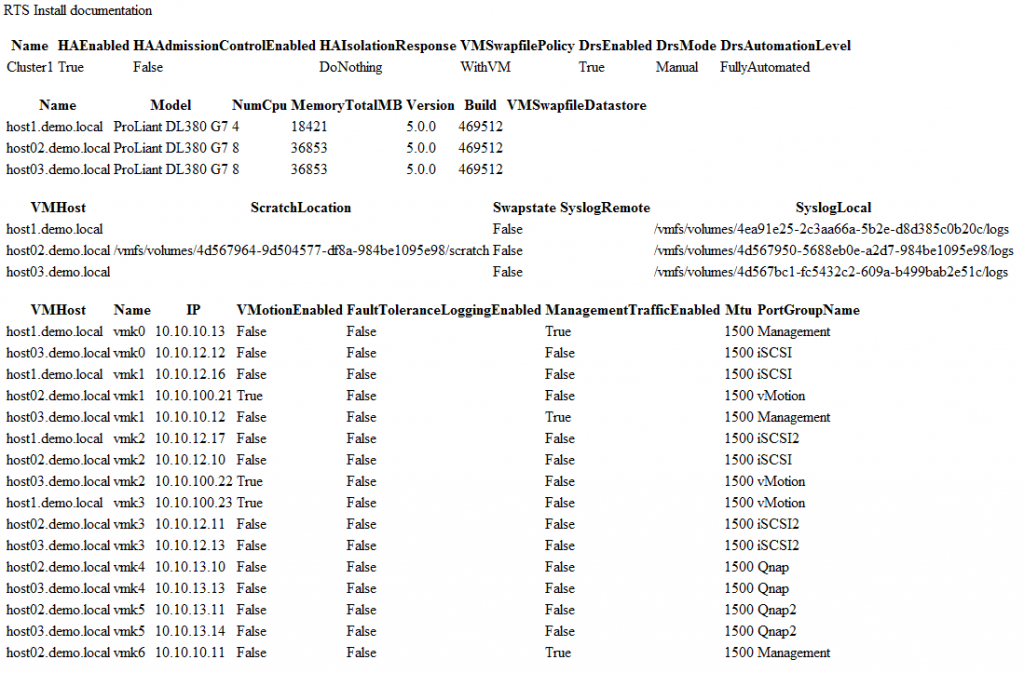
It is still very simple but yet kind of powerfull, we can easily see in the html report if some vmk nic is on the wrong IP subnet or not Jumboframes activated, the following screen dump shows the report, yes it is no fancy headlines and stuff yet 😉

I am going to work a lot more such as built in error checking and try to get some nice colors if a value differs with the other hosts, and also reporting on vSwitches and portgroups that they have the right uplinks etc, but that will have to be tomorrow or another day 🙂

# Check for Host Configuration and report
#
# Niklas Åkerlund / RTS
#

$vCenter = "vcenter.demo.local"
$AdvConf = @()
$Cluster = "Cluster1"

# We only want to get info from hosts that are online
Connect-VIServer $vCenter

$VMHosts = Get-Cluster -Name $Cluster | Get-VMHost | where {$_.ConnectionState -eq "Connected" }

# Get the cluster config 
$ClusterConf = Get-Cluster -Name $Cluster | Select-Object Name,HAEnabled,HAAdmissionControlEnabled,HAIsolationResponse,VMSwapfilePolicy,DrsEnabled,DrsMode,DrsAutomationLevel | ConvertTo-Html -Fragment


# Get Basic Conf 
$BaseConf = $VMHosts | Select-Object Name,Model,NumCPU,MemoryTotalMB,Version,Build,VMSwapfileDatastore | Sort-Object Name | ConvertTo-Html -Fragment

#adv config settings
foreach ($VMHost in $VMHosts){ 
		$into = New-Object PSObject
		Add-Member -InputObject $into -MemberType NoteProperty -Name VMHost $VMHost.Name
		$AdvScratch = Get-VMHostAdvancedConfiguration -VMHost $VMHost -Name ScratchConfig.ConfiguredScratchlocation
		$AdvScratch = [string]$AdvScratch.Values
		Add-Member -InputObject $into -MemberType NoteProperty -Name ScratchLocation $AdvScratch
		$AdvSwap = Get-VMHostAdvancedConfiguration -VMHost $VMHost -Name ScratchConfig.CurrentSwapState
		$AdvSwap = [string]$AdvSwap.Values
		Add-Member -InputObject $into -MemberType NoteProperty -Name Swapstate $AdvSwap
		$AdvSyslogRemote = Get-VMHostAdvancedConfiguration -VMHost $VMHost -Name Syslog.Remote.Hostname
		$AdvSyslogRemote = [string]$AdvSyslogRemote.Values
		Add-Member -InputObject $into -MemberType NoteProperty -Name SyslogRemote $AdvSyslogRemote
		$AdvSyslogLocal = Get-VMHostAdvancedConfiguration -VMHost $VMHost -Name Syslog.Local.DatastorePath
		$AdvSyslogLocal = [string]$AdvSyslogLocal.Values
		Add-Member -InputObject $into -MemberType NoteProperty -Name SyslogLocal $AdvSyslogLocal
		$AdvConf += $into

}

$AdvConf = $AdvConf | Sort-Object VMhost | ConvertTo-Html -Fragment

# Vmk ports and their MTU

$NetConf = $VMHosts | Get-VMHostNetworkAdapter | where {$_.Name -match "vmk"} | Select-Object VMHost,Name,IP,VMotionEnabled,FaultToleranceLoggingEnabled,ManagementTrafficEnabled,Mtu,PortGroupName | Sort-Object Name,VMHost | ConvertTo-Html -Fragment

# Create the html report from the different parts 
ConvertTo-Html -body "RTS Install documentation <p> $ClusterConf <p> $BaseConf <p> $AdvCOnf <p> $NetConf" -Title "RTS Installationscheck" | Out-File install.html


PowerCLI to the rescue, how to check all VMs for Network card type

I got a question what network card some VMs had in a datacenter, as a best practice you should use VMXNET 3 where it is possible because it gives the best performance.

So i wrote this very simple script in a few lines that do a csv export of all VMs and what kind of NIC they have, of course one could extend it with OS and stuff but that will have to be next time cause my schedule is kind of tight.

When you use the wizard to set up a Windows 2008 R2 the vSphere set an E1000 NIC by default and that is not what we want, so set up a correct template or remove this nic and add a new when installing single machines!

# Get the Virtual Network Adapter
#
# Niklas Ã…kerlund / RTS
$VMs = Get-VM *
$Data = @()
foreach ($VM in $VMs){
$NICs = $VM.NetworkAdapters
foreach ($NIC in $NICs) {
$into = New-Object PSObject
Add-Member -InputObject $into -MemberType NoteProperty -Name VMname $VM.Name
Add-Member -InputObject $into -MemberType NoteProperty -Name NICtype $NIC.Type
$Data += $into
}
}
$Data | Export-Csv -Path e:\temp\admna\NICs.csv -NoTypeInformation


Hot-add CPU and Memory in a Win 2008 Datacenter with SQL in vSphere

I have today tested how it works to hot-add both memory and vCPU to a virtual machine running Windows 2008 R2 Datacenter Edition, this machine also has SQL 2008 R2 Enterprise edition installed.

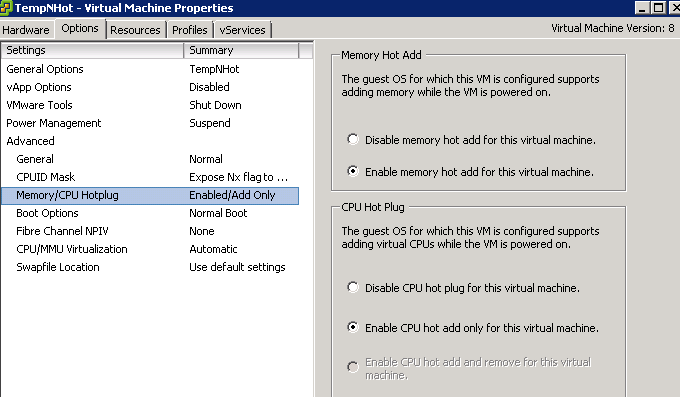
First i had to enable hot-plug in the virtual machine, there is of course two ways to do this, either via the GUI or

the powerCLI way:

$vmConfigSpec = New-Object VMware.Vim.VirtualMachineConfigSpec
$mem = New-Object VMware.Vim.optionvalue
$mem.Key="mem.hotadd"
$mem.Value="true"
$vmConfigSpec.extraconfig += $mem
$cpu = New-Object VMware.Vim.optionvalue
$cpu.Key="vcpu.hotadd"
$cpu.Value="true"
$vmConfigSpec.extraconfig += $cpu

$vm = Get-VM TempNHot | Get-View
$vm.ReconfigVM_Task($vmConfigSpec)

when this has been executed on the particular VM i can then when it is running use powerCLI again and add resources to it.

Get-VM TempNHot | Set-VM -MemoryMB 3072 -NumCpu 4 -Confirm:$false

According to Microsoft documentation it is only supported to do hot-add of memory and CPU in Datacenter edition of Windows, Also regarding SQL you have to use either Enterprise or Datacenter edition to also get it working into the application.

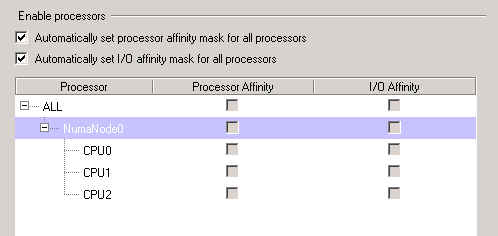
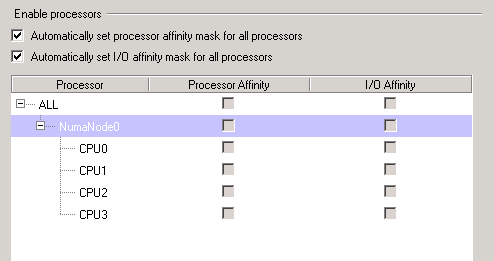
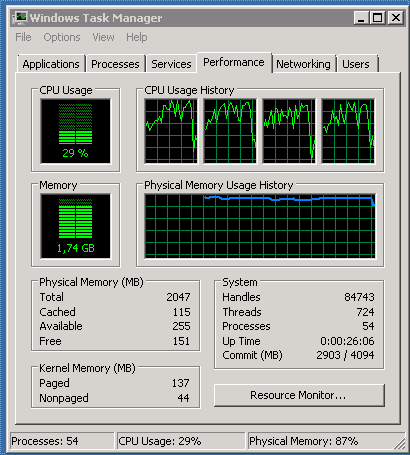
To check that the new resources where used i tested with the SQLstress application to get some load on the SQL server and check the taskmgr, but it did not show that the load where spreading to the new added vCPU, after some research i found out that the SQL server do not start to use new hardware right away, it need to be reconfigured to schedule load on additional CPU´s, so there is a little manual intervention but no downtime on the server!

before:

So i started a query in SQL Management Studio and wrote

RECONFIGURE;
GO

After :

In the taskmanager i could now see that all four vCPU where equally loaded by the SQL server.

Maybe it is not so common to have to do this but if you set up a large Tier-1 SQL server in a virtual world you surely want to be able to hot-add resources when it is loaded. Think of the advantages that this brings when you actually both can add memory and cpu resources without any downtime!

In a virtualization world we always recommend our customers to buy Windows Datacenter licenses on their hosts so using it on a VM will not add any extra cost. The SQL server is of course quite a price jump from standard to enterprise but if your big SQL server uses more than 64 GB ram you will still need to use Enterprise licenses 🙂


Configure VM settings and vmdk´s with powerCLI

I want to share my latest automation scripting, i am in a project where we are in-sourcing from a hosting company. We have connected the hosts to the outsourcers NFS share, of course with powerCLI, when doing it this way i get the datastores on all servers in our cluster, without the risk of differences between the hosts datastores.

# Create NFS shares on all hosts
#
# Niklas Ã…kerlund /RTS
$NFSdatas = Import-Csv -Path "nfsdatastores.csv" -Delimiter ";"
$VIHosts = get-cluster -Name Cluster1 | get-vmhost | where {$_.ConnectionState -eq "Connected"}
foreach ($VIHost in $VIHosts){
foreach ($NFSdata in $NFSdatas){
$NFSHost = $NFSdata.Host
$NFSshare = $NFSdata.Share
$NFSShareName = $NFSdata.ShareName
if (($VIHost | Get-Datastore | where {$_.Name -eq $NFSShareName -and $_.type -eq "NFS"}-ErrorAction SilentlyContinue) -eq $null){
Write-Host "Monterar NFSstore $($NFSShareName) på $($VIHost)"
New-Datastore -Nfs -VMHost $VIHost -Name $NFSShareName -Path $NFSshare -NfsHost $NFSHost
}
}
}

Now when we have this in place, during the transitions the hosting company shut down the VMs on their hosts that we are going to take over.  And we add the VM to the inventory on our vCenter, when doing this the vmdk got a different datastore id in the config, also some settings should be updated to the corporate standard for the virtualization platform at the customer.

# Script to update VM with vmdk and right settings
#
# Argument in is VM name
# Niklas Akerlund / RTS AB 2011

$VMname = $args[0]
if ($VMname -ne $null){
$VM = Get-VM $VMname
$Datastore = Get-Datastore -VM $VM
$HDDs = Get-Harddisk -VM $VM

# Remove incorrect hdd referenes

Remove-HardDisk -HardDisk $HDDs -Confirm:$false

foreach ($HDD in $HDDs){
$HDDname = $HDD.Filename
$HDDsNames = $HDDname.Split("/")
$count = $HDDsNames.count
$VMdkName = $HDDsNames[$count-1]
#Write-Host $VMdkName
$diskpath = "[" + $Datastore.Name + "] " + $VM.Name + "/" + $VMdkName

#Write-Host $diskpath

New-HardDisk -VM $VM -DiskPath $diskpath
}

# Reconfigure VM Settings

$spec = new-object VMware.Vim.VirtualMachineConfigSpec
$spec.MemoryAllocation = New-Object VMware.Vim.ResourceAllocationInfo
$spec.MemoryAllocation.Limit = -1
$spec.CpuAllocation = New-Object VMware.Vim.ResourceAllocationInfo
$spec.CpuAllocation.Limit = -1
$spec.tools = New-Object VMware.Vim.ToolsConfigInfo
$spec.tools.toolsUpgradePolicy = "manual"
$spec.swapPlacement = "inherit"

$VM = $VM | get-view
$VM.ReconfigVM_Task($spec)
}

After this we start up the VM and later we do a storage vMotion of the VM to the customers FC-SAN

Get-VM theVM | Move-VM -Datastore fcdatastore1

Host Profiles and vmkernel ports with Jumbo Frames MTU 9000

Today i have found a limitation using host profiles and this together with a vmkernel port that has Mtu 9000 activated. maybe it has not been a requirement when designing the host profiles?

We set up the reference host with 4 vmkernel ports, one for management, one for vmotion, one for FT and one for NFS. The port that we wanted to use Jumbo frames for was the vmotion port.

As i wrote in an earlier post, I used the powerCLI to configure the Mtu for the actual vmkernel port Get-VmhostNetworkAdapter -Name vmk1 | Set-VmhostNetworkAdapter -Mtu 9000.

Then i add this host as an reference host in the Host Profiles and attach it to the cluster. Adding a new host and then Apply profile, creates all our vmkernel ports correctly but when checking what Mtu the vmotion vmkernel port got, it is created with the default Mtu of 1500. This is not so good because i do not want to use several different ways to configure and i want to be able to trust the Host Profiles solution. The only vmkernel port that was created before applying host profiles was the management port so it has nothing to do with editing exisiting. So the result is that i need to after applying a host profile, run a powerCLI command to edit the Mtu.

Strangely no matter if the Mtu is 9000 or 1500 the hosts are compliant in the GUI..

This applies to vSphere 4.1 u1 (i do not know how this behaves in vSphere 5)

Conclusion of this is that I have to think a bit more about using the Host profiles. If it is not fully implemented then it is not usable to get uniform hosts.

Edit vmkernel port MTU on distributed switches – using PowerCLI

According to the KB 1038827 “Enabling Jumbo Frames for VMkernel ports in a virtual distributed switch”, VMware says that you have to recreate the vmkernel port to set the MTU for jumbo frames. This is not true if you use powerCLI, I do not know exactly how it is done beneath the hood but it is very easy to configure using quite a few lines scripting..  By the way, there is no way in the GUI to edit this.

$cred = Get-Credential
Connect-VIServer ESXhost.test.loc -credential $cred

Get-VMHostNetworkadapter -name vmk2 | Set-VMHostnetworkadapter -Mtu 9000

Get-VMHostnetworkadapter -name vmk2 | ft Mtu

Setting the Mtu on the vmkernel port is basically not different using a standard vSwitch or a distributed vSwitch.

Of course you can connect to a vcenter and add a foreach loop to set the Mtu for more than one host vmkernel port.

VMware distributed switches and PowerCLI/Onyx

I have had the opportunity to do some PowerCLI scripting on an installation where we have  vDS (virtual Distributed Switch). In the PowerCLI there is not so much cmdlets for the distributed switches, that is kind of awkward as there is so many cmdlets for everything else.. Luckily LucD had made some nice functions for me to use when creating the port groups.

I used his function for creating port groups, as the customer had about 20 vlans that needed to be added it was a perfect match to do it by powerCLI because setting up this manually is boring! So i had a csv file with the name and vlan id which i ran through in a foreach loop, then all was done.


# Create Distributed virtual portgroups for each VLAN
# Niklas Ã…kerlund / RTS AB 2011-09-09
#

$Datacenter = "datacenter"
$vDSName = "dvswitch01"
$vDSPortGroupPorts = 128

# Call Functions from motherscript
. .\Set-vDS-Porgroup-functions2.ps1

$vDS = Get-dvSwitch -DataCenterName $Datacenter -dvSwitchName $vDSName
#Write-Host $vDS
$vlans = Import-Csv vlan.csv -Delimiter ";"

foreach ($vlan in $vlans){
$name = $vlan.Name
$vlanid = $vlan.VLAN
if ($name -ne ""){
Write-Host $name
New-dvSwPortgroup $vDS $name -PgNumberPorts $vDSPortGroupPorts -PgVlanType "VLAN" -PgVlanId $vlanid
}
}

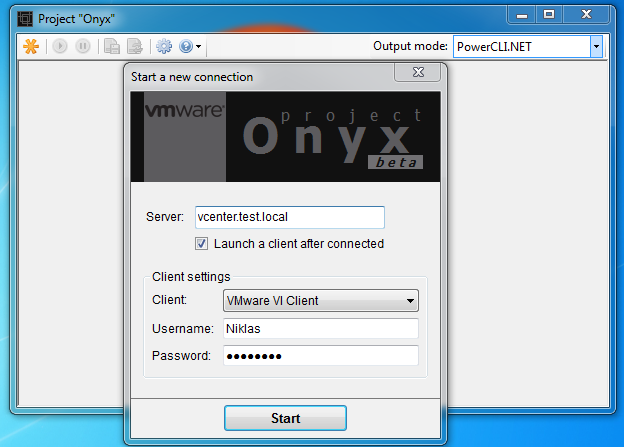
But then we realized that we needed to change some settings with both the security and load balancing so i had to remove all my port groups and start over.. I did not want to remove them manually and the powerCLI cmdlet that removes standard port groups could not be used on a vDS, I did not find the code from LucD in his blog to remove a vDS port group so i came up with the brilliant idea to use Onyx, it is a tool from VMware Labs that interprets the traffic between the vSphere Client and the vCenter and transform it to powerCLI code or .Net or SOAP or Javascript.

I then after starting this tool connected to my vCenter and through the vSphere Client removed a vDS port group, i got the powerCLI code (which I probably could have found out being a bit smarter in powershell/powerCLI without Onyx, but now I´m not :-P) So i did a small script to find all my vDS port groups and remove them.. Note that i cannot remove a vDS port group that already has been populated with connected VM´s.


# Remove vds port groups
#
# Niklas Ã…kerlund / Real Time Services AB

$vlans = Import-Csv vlan.csv -Delimiter ";"

$PGs = Get-VirtualPortGroup

foreach ($vlan in $vlans){
foreach ($PG in $PGs){
if ($vlan.Name -eq $PG.Name){
$destroy = $PG.Id
#Write-Host $destroy
$pek = Get-View -Id $destroy
$pek.Destroy_Task()
}
}
}

And now i could run the add script again with the added parameters for more security and load balancing.

New-dvSwPortgroup $vDS $name -PgNumberPorts $vDSPortGroupPorts<code>
-PgVlanType "VLAN" -PgVlanId $vlanid -SecPolMacChanges:$false</code>
-SecPolForgedTransmits:$false -TeamingPolicy "loadbalance_loadbased"

VMware vCenter and VMware vCenter Update Manager 11

After the vacation this summer i have had much to do and not any time for blogging, i will try to behave better and keep you readers updated in my findings..

I just want to clarify for those of you running several vCenter installations for your different virtualization platforms and use vCenter Update manager for updating your hosts.

When you install the vCenter update manager you can only add one vCenter and there is no support for using the same Update manager for several vCenter instances. From a management point of view it would have been a nice feature to be able to use the same vCenter Update Manager for several vCenter instances in a linked mode, as you would only have one to handle.

In the Update Manager documentation it clearly says : “The Update Manager installation requires a connection with a single vCenter Server instance. ”  link to vSphere 5.0 vum installation documentation is here , This is not new for the 5.0 and is also the case for earlier versions of vCenter and VUM

Move vSphere vCenter database and update perf stat jobs

Today I have helped a customer with ther vCenter database and the rollup jobs that was not present..

Yesterday i noticed that they had missed to update the stat jobs when moving their database to another server (I gave them the KB 7960893 link so they could move the db. allthough they missed step 5 in that list.). This was leading to an growing database and that the performance stats where not being updated. ultimately if the database grows to much and fills the disk the vCenter server will stop. I showed them the KB 1004382 that descripbes how you update or create new stat rollup scripts for your vCenter database, this was not successfull because they did not select the right database for the creation of the jobs..

Again i used the wonderful tool Teamviewer and connected to the customer and helped them to correctly create the jobs.

One important thing is to select the right database when running the script or it will not work when it is going to run.

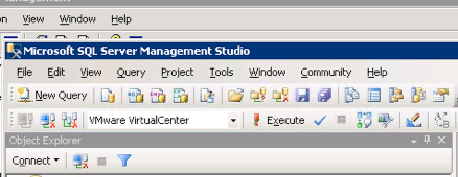
As you can see on the screendump, for one that is not to familiar with SQL management studioi you must select the database beside the ! Execute before executing, the script will run and create a stat rollup job but it will not work because it is looking for stored procedures that are in the vCenter database..

If you not have logged on as the owner of the database (your vcenter service account) you should edit the jobs to be run as that account!