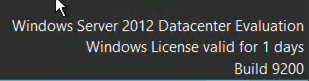
In my little lab it was quite the time to do an rearm of the servers licenses as I had installed them with the evaluation version. This can be done with the slmgr.vbs /rearm command and a reboot.
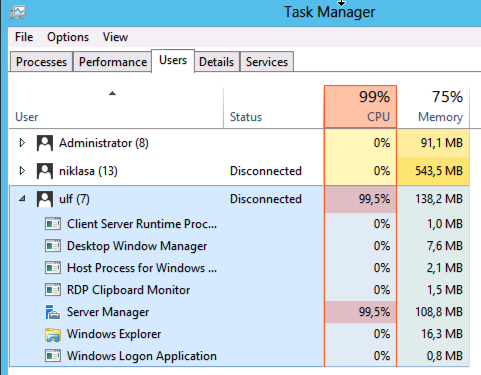
And when I came to the second server where the domain controller resides I noticed that it consumed a lot of memory for just having the DC role.
When looking a bit closer I noticed sessions where me and a colleague that have been logged in but in disconnected mode and consumed both CPU and memory. In almost every server this is not optimal where Admins can stay logged in forever and this can be handled with a GPO setting to restrict the time for a disconnected session on servers residing in a specific OU.
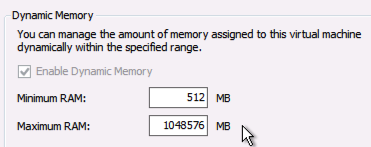
Another problem was that when I created the DC VM I just activated the Dynamic memory without setting any limits and this could cause a host with no physical memory left and VM´s going crazy with allocated memory. Setting the Startup memory is important but also setting the Maximum RAM, I have as a best practice to set the startup and Maximum to the same values.
With PowerShell I easily could change the settings of the VM to have a more reasonable maximum value than 1TB. And as you can see with the -PassThrough parameter I can do it in one line.
As Microsoft has released an updated version with Windows 2012 R2 and System Center 2012 R2 Preview I wanted to give you the script with updated url´s so you can easily download and try out the different roles! Note though that the Configuration Manager evaluation VHD has not yet been released, I still have the link in the script so when it will be available you can download it! They have also changed the packages to .bin instead of .rar.
Make sure that you have enough space on your volume and then run the following script and you will within a time that of course depends on your internet connection have all files necessary to start evaluate. I will update the script with the right size of R2 once I have downloaded all but think that 70 GB will be enough at lest now when SCCM is not available 🙂
And as I already have emphasized is that you can only online resize VHDX´s that are connected to a SCSI controller, and it is only on Generation 2 VM that your Hyper-V VM´s can have the boot disk connected to the SCSI and also that limits the number of OS´s (Windows 2012/2012R2 and Win 8/8.1)
I have not yet successfully migrated a Gen 1 VM´s system disk to a Gen 2 but I am working on it 😛 (the Gen 2 uses UEFTI and GPT) and some kind of backup/restore will probably be required.. I will post updates in my pursue of this task.
In the following part of this post I want to show you how I resize both a VHDX with the system and boot partition on it and an additional VHDX with data on the VM running on the Generation 2.
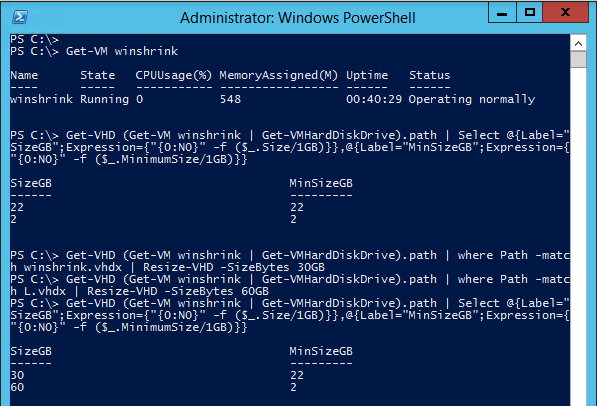
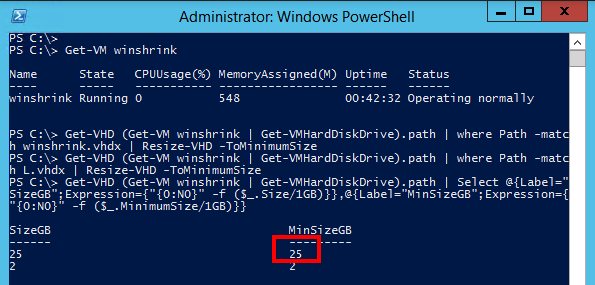
As you can see with this PowerShell I can easily extend the VHDX and also with the following command I can get the minimum size that I can shrink it to, this depends on the volume inside and that can also be shrunk online of course, that has been possible since Windows 2008. I have also gone through this case in an earlier post, the main difference here with R2 is that it can be done online.
When checking the help for the Hyper-V PowerShell module in R2 it can be noted that the help information has not been updated as it says still that it is an offline operation 😛
So to resize during the VM is running is shown here in the following screendump, and as you can see, both the system drive and the L-drive are extended.
And here you can see how we can shrink the VHDX also, note that I have extended the system volume with 3 GB inside the VM also so the minimum have gone up all this when the VM was running!
I read Hyper-V.nu great blog article about Christian Edwards script that checks both hosts and clusters for hotfixes and updates and found some things I wanted to improve in the script, first of all I wanted an object list instead of just some Write-Host with cool colors.. Then I can use the fabulous techniques of PowerShell to just show the once that I do not have installed or make a decent report for my cluster or just standalone hosts.
The next improvement I thought of was the automatic download of all hotfixes.. Well registering at the web page and downloading each hotfix can work for some but not many, so I extended the XML files with the DownloadURL and also changed the script to support either a host or a cluster object. The download parameter will not check what´s installed or not, it will just download all hotfixes that I found URL´s for so bare with me if it is not complete and make a comment or send me a tweet and I will try to update the xml file
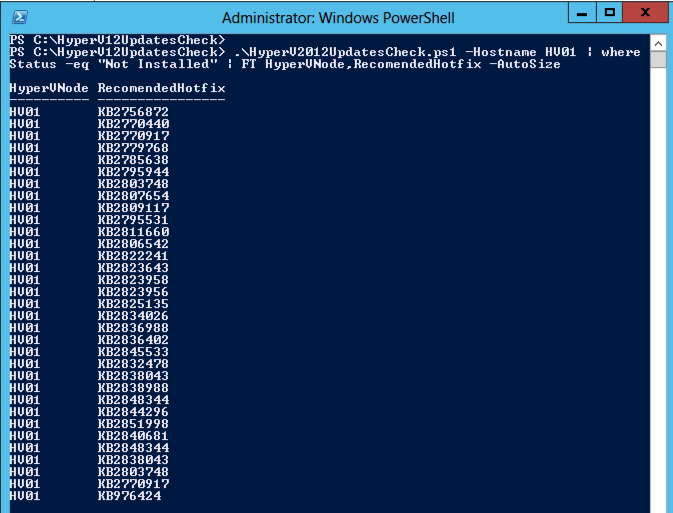
Here you can see how I can run it and also as I have the result as objects filter on installed or not
And here you can see when I check a cluster and also add the parameters for downloading and the path to where the downloaded files shall reside
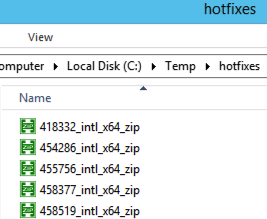
And here is a screendump of some of the hotfix files that are downloaded, as you can see in the script I utilize the BITS engine to download the files 🙂
Updated with hotfixes to 2013-07-15! Here is the script and the xml files with the extended DownloadURL are in this download zip file-> hyperv12updatescheck.
# Remake of Christian Edwards script to make it more flexible
# http://blogs.technet.com/b/cedward/archive/2013/05/31/validating-hyper-v-2012-and-failover-clustering-hotfixes-with-powershell-part-2.aspx
#
# Niklas Akerlund 2013-06-28

param
(
    [parameter(ValueFromPipeline=$true,
                   Position=0)]
    [string]$Hostname,
    [parameter(ValueFromPipeline=$true,
                   Position=1)]
    $ClusterName,
    [switch]$Download,
    [string]$DownloadPath
)

#Getting current execution path
$scriptpath = $MyInvocation.MyCommand.Path
$dir = Split-Path $scriptpath
$listofHotfixes = @()

#Loading list of updates from XML files

[xml]$SourceFileHyperV = Get-Content $dir\UpdatesListHyperV.xml
[xml]$SourceFileCluster = Get-Content $dir\UpdatesListCluster.xml

$HyperVHotfixes = $SourceFileHyperV.Updates.Update
$ClusterHotfixes = $SourceFileCluster.Updates.update

#Getting installed Hotfixes from all nodes of the Cluster/hosts
if ($ClusterName){
    $Nodes = Get-Cluster $ClusterName | Get-ClusterNode | Select -ExpandProperty Name
}else
{
    $Nodes = $Hostname
}
foreach($Node in $Nodes)
{
$Hotfixes = Get-HotFix -ComputerName $Node |select HotfixID,description

foreach($RecomendedHotfix in $HyperVHotfixes)
{
        $witness = 0
        foreach($hotfix in $Hotfixes)
        {
                If($RecomendedHotfix.id -eq $hotfix.HotfixID)
                {
                    $obj = [PSCustomObject]@{
                        HyperVNode = $Node
                        HotfixType = "Hyper-V"
                        RecomendedHotfix = $RecomendedHotfix.Id
                        Status = "Installed"
                        Description = $RecomendedHotfix.Description
                        DownloadURL =  $RecomendedHotfix.DownloadURL
                    }

                   $listOfHotfixes += $obj
                    $witness = 1
                 }
        }
        if($witness -eq 0)
        {

            $obj = [PSCustomObject]@{
                    HyperVNode = $Node
                    HotfixType = "Hyper-V"
                    RecomendedHotfix = $RecomendedHotfix.Id
                    Status = "Not Installed"
                    Description = $RecomendedHotfix.Description
                    DownloadURL =  $RecomendedHotfix.DownloadURL
            }

            $listofHotfixes += $obj

        }
}

foreach($RecomendedClusterHotfix in $ClusterHotfixes)
{
        $witness = 0
        foreach($hotfix in $Hotfixes)
        {
                If($RecomendedClusterHotfix.id -eq $hotfix.HotfixID)
                {
                    $obj = [PSCustomObject]@{
                        HyperVNode = $Node
                        HotfixType = "Cluster"
                        RecomendedHotfix = $RecomendedClusterHotfix.Id
                        Status = "Installed"
                        Description = $RecomendedClusterHotfix.Description
                        DownloadURL =  $RecomendedClusterHotfix.DownloadURL
                    }

                   $listOfHotfixes += $obj

                   $witness = 1
                 }
        }
        if($witness -eq 0)
        {
            $obj = [PSCustomObject]@{
                HyperVNode = $Node
                HotfixType = "Cluster"
                RecomendedHotfix = $RecomendedClusterHotfix.Id
                Status = "Not Installed"
                Description = $RecomendedClusterHotfix.Description
                DownloadURL =  $RecomendedClusterHotfix.DownloadURL
            }

            $listOfHotfixes += $obj
        }
}
}
if ($Download){
    foreach($RecomendedHotfix in $HyperVHotfixes){
        if ($RecomendedHotfix.DownloadURL -ne ""){
            Start-BitsTransfer -Source $RecomendedHotfix.DownloadURL -Destination $DownloadPath
        }
    }
    foreach($RecomendedClusterHotfix in $ClusterHotfixes){
        if ($RecomendedClusterHotfix.DownloadURL -ne ""){
            Start-BitsTransfer -Source $RecomendedClusterHotfix.DownloadURL -Destination $DownloadPath
        }
    }
}

$listofHotfixes
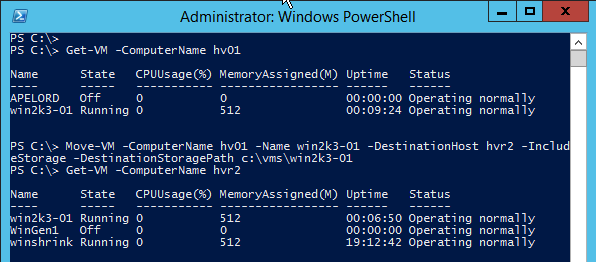
After reading about the possibility to Live Migrate between versions and now getting the R2 bits I had to test the migration of a VM from a Hyper-V 2012 enabled host to a newly installed Hyper-V 2012 R2. I have on both the hosts enabled the migration on the hosts with kerberos authentication and also set up delegation.
When starting a migration I got the following error, and it did not tell me what was actually wrong, but after I disconnected the ISO that was connected the migration succeeded nicely!
So here is a perfect place for you to check your VM´s for connected ISO´s and disconnect them before migrating and that can easily be done with PowerShell,
As you can see it now resides on the 2012 R2 server and is still running :-).
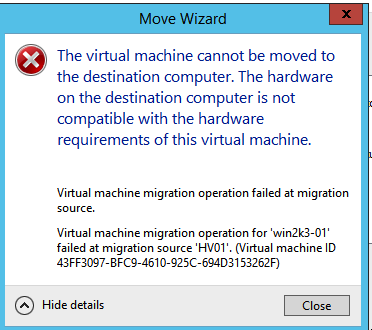
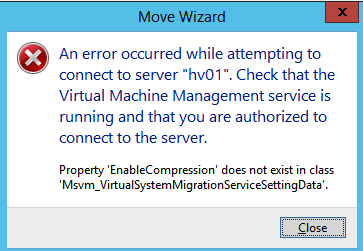
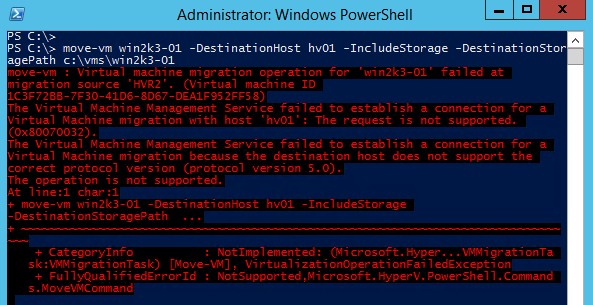
When trying to migrate the VM back to the 2012 Hyper-V I get an strange error (yes I know, it is not supported but I had to try!), the error message could have been a bit more informative, and I have tested to set the migration option to just TCP/IP instead of compression but still get the same error message!
And with powershell I get a bit clearer view of the error message,
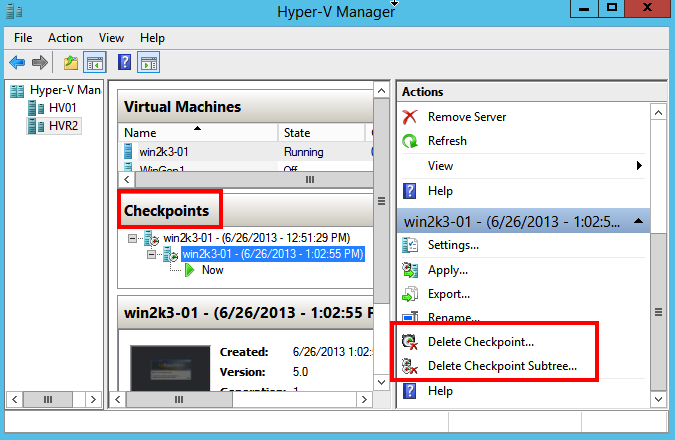
To align the Hyper-V with System Center VMM Microsoft has changed the Hyper-V manager regarding the snapshots to Checkpoints. I personally had preferred that they changed the naming in VMM to snapshots instead, but that is my opinion and maybe that is because of my background in VMware environments 😛
Although the change has been implemented in the GUI, the PowerShell module has not been updated to reflect this as you can see in my next screendump:
The cmdlet to take a checkpoint is as it has been in the Hyper-V Powershell module in 2012, Checkpoint-VM.
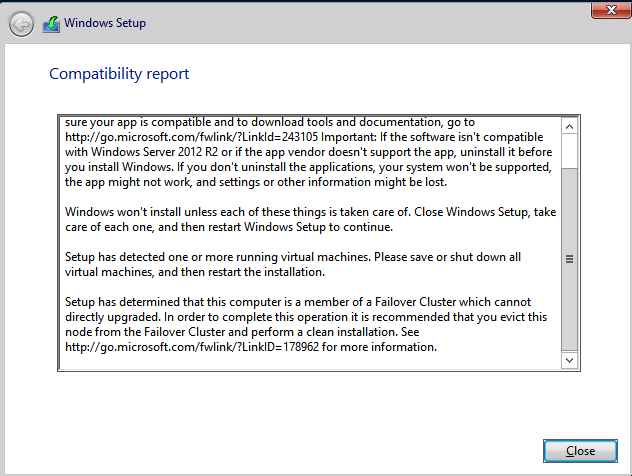
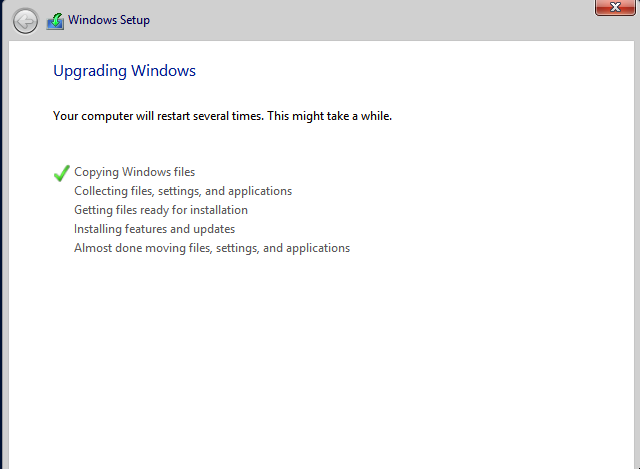
I have installed one Win 2012 R2 with GUI and also I have now tried to upgrade my Windows 2012 Hyper-V core server to R2, as you can see on the screendump below, I had some issues to take care of.
After evicting it from the cluster and also stopping all VM´s I could continue to upgrade the server, it was really fast (now I have SSD and that does make a difference 😛 ) but still, the feeling is that Microsoft have done some work on making the R2 more rapid, the Powershell console is also more alert and responsive when starting it.
I will continue to evaluate the Preview and there will probably be some more posts about my findings in the R2 release 🙂
As the announcement on Teched there has been several improvements on Hyper-V 2012 R2.
With the Windows Hyper-V Server R2 you can create generation 2 virtual machines but these can only be Windows 2012/ Windows 8 or later. And in this post I will try to give you the insight in why it is important that you set up all your virtual machines from now with 2012 and later.
Here are the information about the two features that I want to focus on in this post:
Online resizing of VHDX – You can expand and shrink VHDX files during the virtual machine is running.
Generation 2 virtual machines – Gen2 VMs are legacy free and based on UEFI. So this means no more emulated devices, boot from virtual SCSI controllers or synthetic network adapters (PXE boot >100MBit) and enables UEFI secure boot as a standard. Supported guest operating systems: 64-bit versions of Windows 8, Windows Server 2012, Windows 8.1 and Windows Server 2012 R2.
So, WoW we can now while the virtual machine runs resize the VHDX, not just extend but also shrink! But there is a limitation!! The vhdx must be connected to a SCSI controller in the virtual machine to be able to utilize this feature! And as you know the system drive (often C:\) in Hyper-V Gen 1 VM´s has to be connected to IDE controller. And yes it is best practice to install the applications and databases and stuff on a separate virtual hard drive that you connect to a SCSI controller but quite often the system drive get´s full with windows patches, logs and also some applications, etc and then you want to be able to extend it and being able to do that online is quite sweet!
I have seen several posts that omit this information and it is quite important to be aware of this and that is why I state above that already now before R2, start creating your virtual machines with Win 2012 so that you when R2 is released and you have it in production can migrate your virtual machines to the Generation 2 VM. Yes I know there are several third party software companies that not have support on 2012 yet with their products. But if they do, then there is no reason to install that on a Windows 2008 R2!
When I get my hands on the R2 bits I will test and see how it works to migrate and will do an post about that so check back 🙂
I have done the lab and it is quite impressive how simple and powerfull it is and being able to keep a desired state of installed/configurered servers with a service on them.
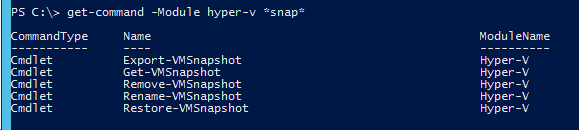
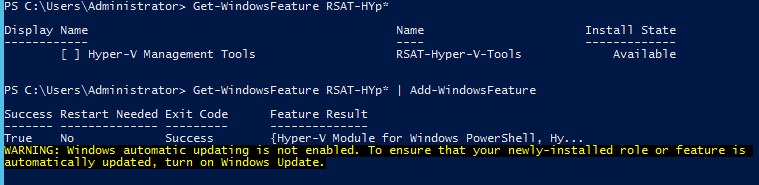
As I was in the lab environment I could not resist to check if there was any new powershell cmdlets for the Hyper-V module in R2
And with this command you can see that there is 14 new cmdlets in the R2 version of the hyper-v module compared to the 2012 version.
Here is a list of all the HOL that is available online and probably there will be more added later on.
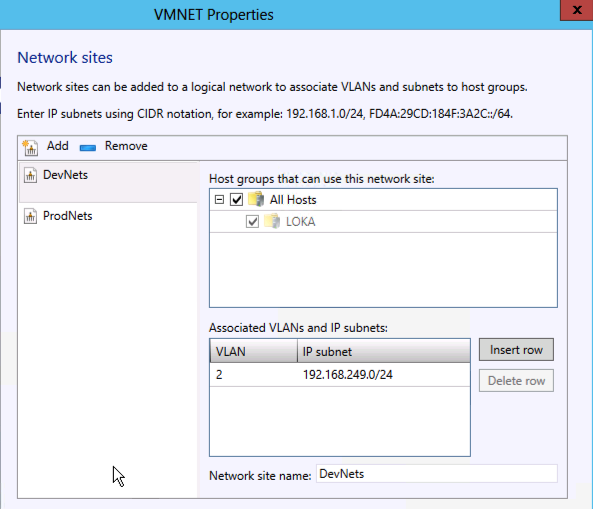
I have created an environment at a customer with bare metal deployment with Hyper-V 2012 and SC VMM 2012 SP1 and in the bare metal profile I am utilizing the logical switches to get a consistent configuration on all hosts and not needing to configure each host every time a new network is going to be set up.
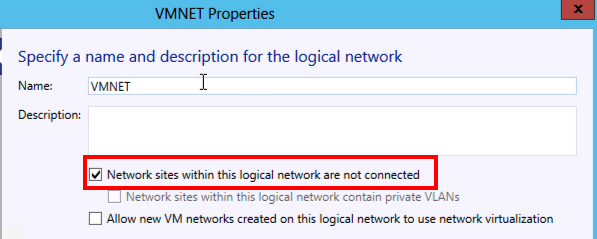
In this case we are using VLAN´s and I want to be able to configure and add them without going through the console and all dialogs in the GUI
To get VLAN properly working you also need to check a box in the logical network properties
So this script asumes that you have a Logical Network already defined and what we do here is adding the subnets in the network sites. If someone finds another way to why I have to add all the subnetVLan objects every time I update the Logical Network Definition, that would be super.. If I do not add all the objects the networks without dependencies are removed.. not so smart
As you can see on this error message when I just try to update with a new Subnet VLAN and not including the other VLAN objects the Set-SCLogicalNetworkDefinition tries to remove and as there is already an VM network it fails. If you look at the script from the gui wizard you will see and understand what I am fuzzing about.
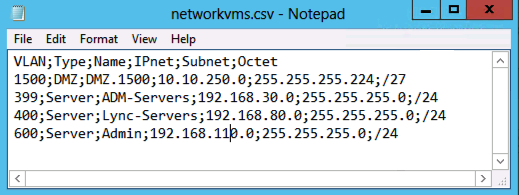
The structure of the CSV file is as the next screendump and If you already have an excel document or some other information table you could easily change the script to suit your environment and deployment.
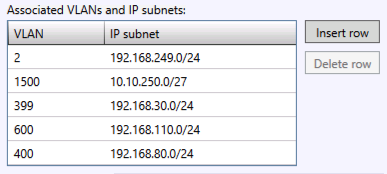
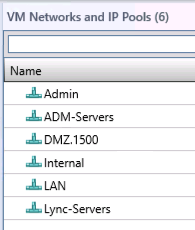
And when running the following PowerShell script it will create not only the subnets in the Network Site but also the VM Networks. Here is the logical network before running the script
And here is after
And the VM network, as you can see on the details on the ADM-Servers details it is connected to the VM Subnet with the VLAN 399
There are some things that I am working on the next version of this simple script, I am going to make it as a function and also some error checking and also verify if the networks already exists or not, that will be posted in another article 🙂