VMware to Hyper-V Migration with MAT and my addons

Today I was on Sommarkollo at Microsoft Sweden and speaking on the event and this was the last of two sessions about the MAT (Migration Automation Toolkit).

This automation tool that I first got to know about at MMS 2013 in Las Vegas (sadly it looks like there will be no more MMS 🙁 but that is another story ) in the session held by “Migration Mark” and Matt McSpirit WS-B325 and there in the video about 41 minutes into I ask about how the MAT take care of IP addresses on the migrated VM´s and they answered me that is not part of the MAT yet! And well I would say that this would be quite painful to migrate 100-200 VM´s with this automation tool and still have to enter IP settings for each migrated vm manually!!

But I have an example on how that can be done, I have not integrated it into the MAT scripts yet but it automates the collection of not just the IP addresses but also dns,subnet and gateway.

The information is available via the PowerCLI from the vCenter and here I show you how you can collect all that info after you have got the migration list

# Collect Networking info from VM´s 
#
# Niklas Akerlund / 2013-07-01
if(!(Get-PSSnapin "VMware.VimAutomation.Core" -ErrorAction SilentlyContinue)){
    Add-PSSnapin "VMware.VimAutomation.Core"
}
$MigVMs = Get-Content "d:\mat\vmlist.txt"
$VMNetConf = @()
Connect-VIServer vCenter.vniklas.com
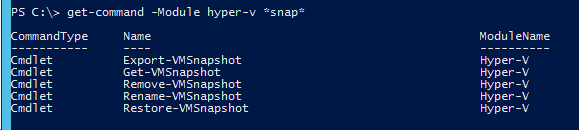
remove-module Hyper-V -ErrorAction SilentlyContinue

foreach ($MigVM in $MigVMs){
     $VM = Get-VM $MigVM.Split(".")[0]
     #write-host $VM
     #$VM = Get-VM $VM 
     $VMNics = Get-VMGuestNetworkInterface $VM | where {$_.IP -ne $null -and $_.IPPolicy -eq "Static"}
     foreach ($VMNic in $VMNics){
         $VMNetAdapter = Get-NetworkAdapter -VM $VMNic.VM -Name $VMNic.NetworkAdapter
          $obj = [PSCustomObject]@{
                        VMName = $VM.Name
                        NetworkName = $VMNetAdapter.NetworkName
                        IP = $VMNic.Ip
                        Subnet = $VMNic.SubnetMask
                        DNS = [string]$VMNic.Dns
                        GW = $VMNic.DefaultGateway
                        }
          $VMNetConf +=$obj
     }
}

$VMNetConf | Export-csv -Path d:\mat\vmniclist.txt -NoTypeInformation -NoClobber -UseCulture

Here you can see the csv file after it has run in my test environment, one thing that I will extend with after discussing with some folks is the vlan number the port group the vm is connected to so that can be configured on the other side also.

Screen Shot 2013-08-15 at 23.30.25

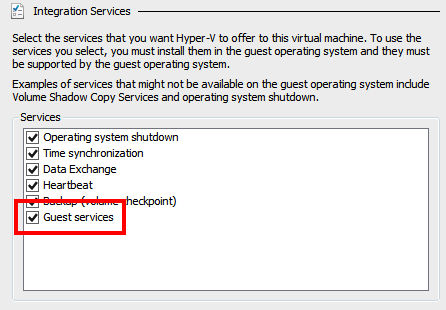
And then I also with the possibility that there is in Hyper-V 2012, configure the network on the guest from the host, this requires that the virtual machine has the latest integration components installed. Ravikanth has done a blog post about how his function, I have added the possibility to run it from a remote computer

# Set-VMNetworkConfiguration
# Orginial by Ravikanth http://www.ravichaganti.com/blog/?p=2766
#
# Added computername to remotly set IP to guest from hosts
# Niklas Akerlund
Function Set-VMNetworkConfiguration {
    [CmdletBinding()]
    Param (
        
        [Parameter(Mandatory=$true,
                   Position=1,
                   ParameterSetName='DHCP',
                   ValueFromPipeline=$true)]
        [Parameter(Mandatory=$true,
                   Position=0,
                   ParameterSetName='Static',
                   ValueFromPipeline=$true)]
        [Microsoft.HyperV.PowerShell.VMNetworkAdapter]$NetworkAdapter,
        
        [Parameter(Mandatory=$true,
                   Position=2,
                   ParameterSetName='DHCP',
                   ValueFromPipeline=$true)]
        [Parameter(Mandatory=$true,
                   Position=5,
                   ParameterSetName='Static',
                   ValueFromPipelineByPropertyName=$true)]
        [String[]]$ComputerName=@(),

        [Parameter(Mandatory=$true,
                   Position=1,
                   ParameterSetName='Static')]
        [String[]]$IPAddress=@(),

        [Parameter(Mandatory=$false,
                   Position=2,
                   ParameterSetName='Static')]
        [String[]]$Subnet=@(),

        [Parameter(Mandatory=$false,
                   Position=3,
                   ParameterSetName='Static')]
        [String[]]$DefaultGateway = @(),

        [Parameter(Mandatory=$false,
                   Position=4,
                   ParameterSetName='Static')]
        [String[]]$DNSServer = @(),
         
        [Parameter(Mandatory=$true,
                   Position=0,
                   ParameterSetName='DHCP')]
        [Switch]$Dhcp
        
    )

    $VM = Get-WmiObject -Namespace 'root\virtualization\v2' -Class 'Msvm_ComputerSystem' -ComputerName $ComputerName | Where-Object { $_.ElementName -eq $NetworkAdapter.VMName } 
    $VMSettings = $vm.GetRelated('Msvm_VirtualSystemSettingData') | Where-Object { $_.VirtualSystemType -eq 'Microsoft:Hyper-V:System:Realized' }    
    $VMNetAdapters = $VMSettings.GetRelated('Msvm_SyntheticEthernetPortSettingData') 

    $NetworkSettings = @()
    foreach ($NetAdapter in $VMNetAdapters) {
        if ($NetAdapter.Address -eq $NetworkAdapter.MacAddress) {
            $NetworkSettings = $NetworkSettings + $NetAdapter.GetRelated("Msvm_GuestNetworkAdapterConfiguration")
        }
    }

    if ($Dhcp) {
        $NetworkSettings[0].DHCPEnabled = $true
    } else {
        $NetworkSettings[0].DHCPEnabled = $false
        $NetworkSettings[0].IPAddresses = $IPAddress
        $NetworkSettings[0].Subnets = $Subnet
        $NetworkSettings[0].DefaultGateways = $DefaultGateway
        $NetworkSettings[0].DNSServers = $DNSServer
        $NetworkSettings[0].ProtocolIFType = 4096
    }

    $Service = Get-WmiObject -Class "Msvm_VirtualSystemManagementService" -Namespace "root\virtualization\v2" -ComputerName $ComputerName
    $setIP = $Service.SetGuestNetworkAdapterConfiguration($VM, $NetworkSettings[0].GetText(1))

    if ($setip.ReturnValue -eq 4096) {
        $job=[WMI]$setip.job 

        while ($job.JobState -eq 3 -or $job.JobState -eq 4) {
            start-sleep 1
            $job=[WMI]$setip.job
        }

        if ($job.JobState -eq 7) {
            write-host "Success"
        }
        else {
            $job.GetError()
        }
    } elseif($setip.ReturnValue -eq 0) {
        Write-Host "Success"
    }
}

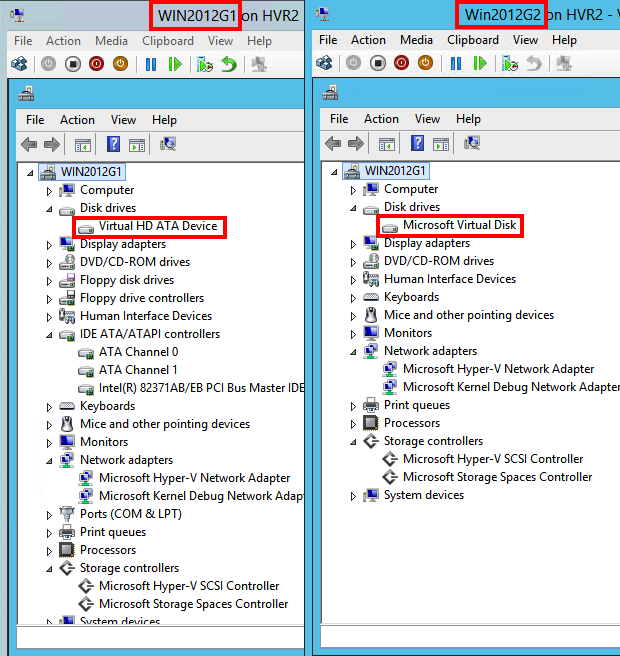
And here is the script that I run to configure the VM´s after the MAT has done the conversions, and yes as Mark says about MAT, there is room for improvements here also of course, As you can see I start with injecting the latest integration components into the VM, the sleep cmdlet is used to get the vm fully booted and integration components installed and then an reboot inside the VM.

# Configure and set VM after Conversion
#
# Niklas AKerlund / 2013-07-01

# Function import
. .\Set-VMNetworkConfiguration.ps1

$VMNICs = Import-CSV -Path D:\mat\vmniclist.txt -Delimiter ";"
$ConvertedVMs = Get-Content -Path D:\mat\VMlist.txt

# Configure each vm before starting
foreach ($ConvertedVM in $ConvertedVMs){
    $VM = Get-VM $ConvertedVM.Split(".")[0]
    write-host $VM.Name
    #patch each VM with latest Integration Tools
    $virtualHardDiskToUpdate =($VM | Get-VMHardDiskDrive).path
    $integrationServicesCabPath ="C:\Windows\vmguest\support\amd64\Windows6.x-HyperVIntegrationServices-x64.cab"

    #Mount the VHD
    $diskNo=(Mount-VHD -Path $virtualHardDiskToUpdate –Passthru).DiskNumber

    #Get the driver letter associated with the mounted VHD, note this assumes it only has one partition if there are more use the one with OS bits
    $driveLetter=(Get-Disk $diskNo | Get-Partition | where Size -GT 100MB).DriveLetter

    #Check to see if the disk is online if it is not online it
    if ((Get-Disk $diskNo).OperationalStatus -ne 'Online'){Set-Disk $MountedVHD.Number -IsOffline:$false -IsReadOnly:$false}

    #Install the patch
    Add-WindowsPackage -PackagePath $integrationServicesCabPath -Path ($driveLetter + ":\")

    #Dismount the VHD
    Dismount-VHD -Path $virtualHardDiskToUpdate
    
    Start-VM -VM $VM

    Start-Sleep -Seconds 300
    
    # Wait for the Integration components being installed and the server reboot (reboot requires interaction or automatic script inside VM or you will have to do an unclean poweroff

    Start-VM -VM $VM

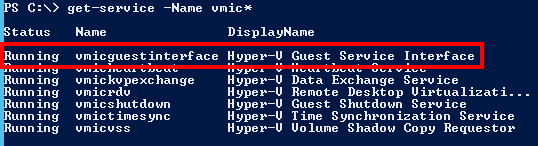
    # check that the migrated VM actually has ic that responds 
    do {
        $notok = Get-VMIntegrationService -VM $VM | Select -First 1 | where PrimaryStatusDescription -eq "OK"
    } while( $notok -eq $null)

    # COnfigure NICs
    foreach ($VMNic in $VMNICs){
        write-host "Configuring" 
        if($VMNIC.VMName -eq $VM.Name){
           if(!(Get-VMNetworkAdapter -VM $VM)){
               $VMNetAdapter = Add-VMNetworkAdapter -VM $VM -SwitchName $VMNic.NetworkName -Passthru
               $VMNetAdapter | Set-VMNetworkConfiguration -IPAddress $VMNic.IP -DefaultGateway $VMNic.GW -Subnet $VMNic.SubnetMask -DNSServer $VMNic.Dns -ComputerName HV03
         
           }else {
           
               Connect-VMNetworkAdapter -VMName $VM.Name -SwitchName $VMNic.NetworkName
               $VMNetAdapter = Get-VMNetworkAdapter -VM $VM
               write-host "connecting $VMNic.NetworkName "
               $VMNetAdapter | Set-VMNetworkConfiguration -IPAddress $VMNic.IP -DefaultGateway $VMNic.GW -Subnet $VMNic.Subnet -DNSServer $VMNic.DNS -ComputerName HV03
          }
        }
    }

}

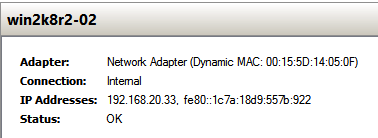
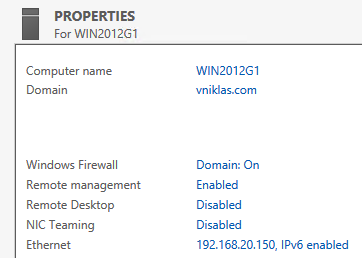
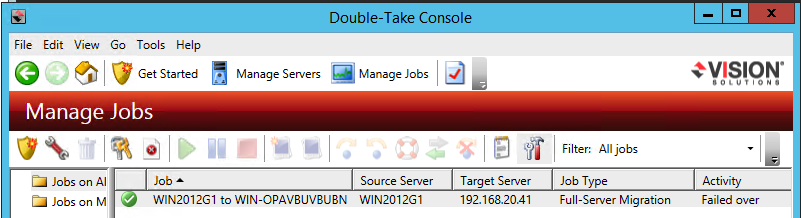
And after running as you can see in the Hyper-V manager I have the right IP on the VM (and if you check inside the VM, you will see that the dns,subnet and gateway also has been set correctly.

Screen Shot 2013-08-15 at 23.38.27

Successfully Migrate Gen1 VM to Gen2 on Windows HyperV R2

I have written an article about why it was important to start installing your VM´s as Windows 2012 and also I mentioned it in my article about resizing vhdx on the new Windows 2012 R2 and I did not have a solution how to migrate the VM.

Today I have successfully migrated a Generation 1 VM with Windows 2012 standard to a Generation 2 VM on a Windows 2012 R2 Hyper-V host. This involved a third party software from Vision Solutions called Double-Take Move.

What I did was installing a Windows 2012 on a Generation 1 VM and updated to the latest integration components. I configured a static IP, changed server name and added it to the domain. Then I also added some files and installed the Web Server role with a custom webpage to see that the service responded after the fail-over.

Screen Shot 2013-08-08 at 10.49.44

Last step was to install the Double-Take Move software.

Screen Shot 2013-08-08 at 13.55.27

And for the target I created a Generation 2 VM and installed Windows 2012 and also here updated to latest integration components. In this VM I only installed the Double-Take Move software. The VM was configured with DHCP and no domain join.

Then It was time to create a Move-Job and after a full sync I could do a failover:

Screen Shot 2013-08-08 at 13.54.57

And as you can see on the following screendump, the Gen2 VM have got the right settings. And of course my web page responded as expected!

Screen Shot 2013-08-08 at 13.14.17

And here is a comparison on the device manager between the two and as you can see that the IDE is gone in the G2.

Screen Shot 2013-08-08 at 14.13.43

The Double-Take Move is a powerful tool and it requires a license to work. They also have integration with System Center VMM and Orchestrator to automate a large scale migration. Now I just tried to migrate inside a hyper-v host between two VM´s but I could have done a migration from a VMware environment or a physical server instead :-).

After working a lot with NetIQ Platespin Migrate (which has unfortunately been lagging behind in the development and support for newer os) I now have a positive experience of the Double-Take software and the easy to use and start migrating!

Exploring the Hyper-V 2012 R2 and Copy-VMFile Powershell cmdlet

Today I have been exploring a bit in the Windows 2012 R2 Preview and when looking in the technet article “What´s new in Hyper-V 2012 R2” I found the interesting part with the new Integration Service “Guest Services” that allows moving files from the host to the virtual machine without any network connectivity.

This requires two things, first that the “Guest Services” integration component is activated in the VM settings and also that the virtual machine has the latest integrational components installed and the “Hyper-V Guest Interface” service running.

integrationservices

When creating a new virtual machine this is not enabled but I have noticed that when you install Windows 2012 R2 inside the Virtual Machine it gets enabled somehow during the installation, both good and bad… Maybe you want to have some control on what VM´s get this enabled, this can however be a Preview “bug” and will change when the R2 is RTM.

Inside the VM the following Service is running and makes it possible to move files to the VM from the Host. Note that even that you can run the powershell cmdlet from a remote server that have the Hyper-V RSAT tools installed you will have to put the file/files you want to transfer to the VM on the host!

integrationserviceinsidevm

And with this command I move a file into the VM, the parameter -FileSource that only accepts Host today implies that it might be possible to also move files from the VM to the host in a later version. (this can be done with the mounting of the parent disk of a vhd/vhdx after a snapshot that I have done a blog post about before)

Screen Shot 2013-08-07 at 13.43.44
Move-Item c:\temp\vNiklasMove.txt -Destination \\hvr2\c$\temp\vNiklasMove.txt
Copy-VMFile -VMName Yellow -ComputerName hvr2 -SourcePath C:\temp\vNiklasMove.txt -DestinationPath c:\temp\vNiklasMove.txt -FileSource Host -CreateFullPath

With the parameter -CreateFullPath the folders will be created that I have in the -DestinationPath inside the VM.

If you want to check what VM´s have this Integration guest service enabled you can check it with PowerShell and also disable it and only enable on a per VM basis when transferring files.

Get-VM -ComputerName hvr2 | Get-VMIntegrationService -Name "Guest Service Interface" | where Enabled -eq $true | Disable-VMIntegrationService -Passthru

And on the following screendump you can see that after disabling this I cannot transfer files to the VM.

Screen Shot 2013-08-07 at 14.04.43


Importance to set Dynamic Memory Maximum in Hyper-V 2012

In my little lab it was quite the time to do an rearm of the servers licenses as I had installed them with the evaluation version. This can be done with the slmgr.vbs /rearm command and a reboot.

Screen Shot 2013-07-23 at 11.08.23

And when I came to the second server where the domain controller resides I noticed that it consumed a lot of memory for just having the DC role.

Screen Shot 2013-07-23 at 11.14.26

When looking a bit closer I noticed sessions where me and a colleague that have been logged in but in disconnected mode and consumed both CPU and memory. In almost every server this is not optimal where Admins can stay logged in forever and this can be handled with a GPO setting to restrict the time for a disconnected session on servers residing in a specific OU.


Screen Shot 2013-07-23 at 11.18.52

 Another problem was that when I created the DC VM I just activated the Dynamic memory without setting any limits and this could cause a host with no physical memory left and VM´s going crazy with allocated memory. Setting the Startup memory is important but also setting the Maximum RAM, I have as a best practice to set the startup and Maximum to the same values.

Screen Shot 2013-07-23 at 11.21.41

With PowerShell I easily could change the settings of the VM to have a more reasonable maximum value than 1TB. And as you can see with the -PassThrough parameter I can do it in one line.

Screen Shot 2013-07-25 at 11.18.34
PS C:\> get-vm dc01 | Stop-VM -Passthru | Set-VM -MemoryMaximumBytes 2GB -Passthru | Start-VM

And after the DC restarted you can see that it only consumes 624 MB RAM.

Screen Shot 2013-07-23 at 11.34.37

Download all System Center R2 eval VHD with PowerShell

I have already blogged about how to use PowerShell to download all of the System Center 2012 SP1 VHD evaluation files with PowerShell and BITS.

As Microsoft has released an updated version with Windows 2012 R2 and System Center 2012 R2 Preview I wanted to give you the script with updated url´s so you can easily download and try out the different roles! Note though that the Configuration Manager evaluation VHD has not yet been released, I still have the link in the script so when it will be available you can download it! They have also changed the packages to .bin instead of .rar.

Make sure that you have enough space on your volume and then run the following script and you will within a time that of course depends on your internet connection have all files necessary to start evaluate. I will update the script with the right size of R2 once I have downloaded all but think that 70 GB will be enough at lest now when SCCM is not available 🙂

# Download all SC 2012 R2 Preview VHD Eval
#
# Niklas Akerlund / Lumagate 2013-07-10

# Downloadfolder
$Dest = "D:\VHDEVALR2"
$SizeOfSCR2 = 70GB

# Get Space on volume
$SpaceRemaining = (Get-Volume $Dest.Split(":")[0]).SizeRemaining

if($SpaceRemaining -gt $SizeOfSCR2){
# SCVMM
((Invoke-WebRequest -Uri "http://www.microsoft.com/en-us/download/confirmation.aspx?id=34803").links | ? href -match "rar$|exe$|docx$|bin$").href | %{Start-BitsTransfer -Source $_ -Destination $Dest}
# SCOM
((Invoke-WebRequest -Uri "http://www.microsoft.com/en-us/download/confirmation.aspx?id=34780").links | ? href -match "rar$|exe$|docx$|bin$").href | %{Start-BitsTransfer -Source $_ -Destination $Dest}
# SCORCH
((Invoke-WebRequest -Uri "http://www.microsoft.com/en-us/download/confirmation.aspx?id=34778").links | ? href -match "rar$|exe$|docx$|bin$").href | %{Start-BitsTransfer -Source $_ -Destination $Dest}
# SCAC
((Invoke-WebRequest -Uri "http://www.microsoft.com/en-us/download/confirmation.aspx?id=39369").links | ? href -match "rar$|exe$|docx$|bin$").href | %{Start-BitsTransfer -Source $_ -Destination $Dest}
# SCDPM
((Invoke-WebRequest -Uri "http://www.microsoft.com/en-us/download/confirmation.aspx?id=34779").links | ? href -match "rar$|exe$|docx$|bin$").href | %{Start-BitsTransfer -Source $_ -Destination $Dest}
# SCCM
((Invoke-WebRequest -Uri "http://www.microsoft.com/en-us/download/confirmation.aspx?id=39368").links | ? href -match "rar$|exe$|docx$|bin$").href | %{Start-BitsTransfer -Source $_ -Destination $Dest}
# SCSM
((Invoke-WebRequest -Uri "http://www.microsoft.com/en-us/download/confirmation.aspx?id=34777").links | ? href -match "rar$|exe$|docx$|bin$").href | %{Start-BitsTransfer -Source $_ -Destination $Dest}
# SCSM DW
((Invoke-WebRequest -Uri "http://www.microsoft.com/en-us/download/confirmation.aspx?id=39367").links | ? href -match "rar$|exe$|docx$|bin$").href | %{Start-BitsTransfer -Source $_ -Destination $Dest}
}else{
[int]$Sum = ($SizeOfSCR2 - $SpaceRemaining)/1GB
Write-Host "Free up at least $Sum GB and try again!"
}

Start downloading and explore while your vacation rains away (actually the first day it rains here for some weeks)!

Resizing VHDX´s on running VM´s in Windows 2012 R2 Hyper-V

As I described in an earlier post about why you should think about creating VM´s with Windows 2012 now when the Windows 2012 R2 have arrived I have now tested the online VHDX resize function.

And as I already have emphasized is that you can only online resize VHDX´s that are connected to a SCSI controller, and it is only on Generation 2 VM that your Hyper-V VM´s can have the boot disk connected to the SCSI and also that limits the number of OS´s (Windows 2012/2012R2 and Win 8/8.1)

I have not yet successfully migrated a Gen 1 VM´s system disk to a Gen 2 but I am working on it 😛 (the Gen 2 uses UEFTI and GPT) and some kind of backup/restore will probably be required..  I will post updates in my pursue of this task.

Screen Shot 2013-06-28 at 22.56.20

In the following part of this post I want to show you how I resize both a VHDX with the system and boot partition on it and an additional VHDX with data on the VM running on the Generation 2.

As you can see with this PowerShell I can easily extend the VHDX and also with the following command I can get the minimum size that I can shrink it to, this depends on the volume inside and that can also be shrunk online of course, that has been possible since Windows 2008. I have also gone through this case in an earlier post, the main difference here with R2 is that it can be done online.

When checking the help for the Hyper-V PowerShell module in R2 it can be noted that the help information has not been updated as it says still that it is an offline operation 😛

Screen Shot 2013-06-30 at 16.55.16

So to resize during the VM is running is shown here in the following screendump, and as you can see, both the system drive and the L-drive are extended.

Screen Shot 2013-06-30 at 19.58.34

And here you can see how we can shrink the VHDX also, note that I have extended the system volume with 3 GB inside the VM also so the minimum have gone up all this when the VM was running!

Screen Shot 2013-06-30 at 19.59.50

Here is the Powershell

Get-VHD (Get-VM winshrink | Get-VMHardDiskDrive).path | Select @{Label="SizeGB";Expression={"{0:N0}" -f ($_.Size/1GB)}},@{Label="MinSizeGB";Expression={"{0:N0}" -f ($_.MinimumSize/1GB)}}

Get-VHD (Get-VM winshrink | Get-VMHardDiskDrive).path | where Path -match winshrink.vhdx | Resize-VHD -SizeBytes 30GB

Get-VHD (Get-VM winshrink | Get-VMHardDiskDrive).path | where Path -match L.vhdx | Resize-VHD -SizeBytes 60GB

Get-VHD (Get-VM winshrink | Get-VMHardDiskDrive).path | where Path -match winshrink.vhdx | Resize-VHD -ToMinimumSize

Get-VHD (Get-VM winshrink | Get-VMHardDiskDrive).path | where Path -match L.vhdx | Resize-VHD -ToMinimumSize

Happy extending and shrinking your SCSI attached VHDX hdd

Hotfix and updates check of Hyper-V and Cluster with Powershell

I read Hyper-V.nu great blog article about Christian Edwards script that checks both hosts and clusters for hotfixes and updates and found some things I wanted to improve in the script, first of all I wanted an object list instead of just some Write-Host with cool colors.. Then I can use the fabulous techniques of PowerShell to just show the once that I do not have installed or make a decent report for my cluster or just standalone hosts.

The next improvement I thought of was the automatic download of all hotfixes.. Well registering at the web page and downloading each hotfix can work for some but not many, so I extended the XML files with the DownloadURL and also changed the script to support either a host or a cluster object. The download parameter will not check what´s installed or not, it will just download all hotfixes that I found URL´s for so bare with me if it is not complete and make a comment or send me a tweet and I will try to update the xml file

Here you can see how I can run it and also as I have the result as objects filter on installed or not

Screen Shot 2013-06-28 at 01.36.51

And here you can see when I check a cluster and also add the parameters for downloading and the path to where the downloaded files shall reside

Screen Shot 2013-06-28 at 01.40.18

And here is a screendump of some of the hotfix files that are downloaded, as you can see in the script I utilize the BITS engine to download the files 🙂

Screen Shot 2013-06-28 at 01.32.35

Updated with hotfixes to 2013-07-15! Here is the script and the xml files with the extended DownloadURL are in this download zip file-> hyperv12updatescheck.

# Remake of Christian Edwards script to make it more flexible
# http://blogs.technet.com/b/cedward/archive/2013/05/31/validating-hyper-v-2012-and-failover-clustering-hotfixes-with-powershell-part-2.aspx
#
# Niklas Akerlund 2013-06-28

param
(
    [parameter(ValueFromPipeline=$true,  
                   Position=0)]
    [string]$Hostname,
    [parameter(ValueFromPipeline=$true, 
                   Position=1)]
    $ClusterName,
    [switch]$Download,
    [string]$DownloadPath
)

#Getting current execution path
$scriptpath = $MyInvocation.MyCommand.Path
$dir = Split-Path $scriptpath
$listofHotfixes = @()

#Loading list of updates from XML files

[xml]$SourceFileHyperV = Get-Content $dir\UpdatesListHyperV.xml
[xml]$SourceFileCluster = Get-Content $dir\UpdatesListCluster.xml

$HyperVHotfixes = $SourceFileHyperV.Updates.Update
$ClusterHotfixes = $SourceFileCluster.Updates.update

#Getting installed Hotfixes from all nodes of the Cluster/hosts
if ($ClusterName){
    $Nodes = Get-Cluster $ClusterName | Get-ClusterNode | Select -ExpandProperty Name
}else
{
    $Nodes = $Hostname
}
foreach($Node in $Nodes)
{
$Hotfixes = Get-HotFix -ComputerName $Node |select HotfixID,description

foreach($RecomendedHotfix in $HyperVHotfixes)
{
        $witness = 0
        foreach($hotfix in $Hotfixes)
        {
                If($RecomendedHotfix.id -eq $hotfix.HotfixID)
                {
                    $obj = [PSCustomObject]@{
                        HyperVNode = $Node
                        HotfixType = "Hyper-V"
                        RecomendedHotfix = $RecomendedHotfix.Id
                        Status = "Installed"
                        Description = $RecomendedHotfix.Description
                        DownloadURL =  $RecomendedHotfix.DownloadURL
                    } 
                   
                   $listOfHotfixes += $obj
                    $witness = 1
                 }
        }  
        if($witness -eq 0)
        {
            
            $obj = [PSCustomObject]@{
                    HyperVNode = $Node
                    HotfixType = "Hyper-V"
                    RecomendedHotfix = $RecomendedHotfix.Id
                    Status = "Not Installed"
                    Description = $RecomendedHotfix.Description
                    DownloadURL =  $RecomendedHotfix.DownloadURL
            } 
                   
            $listofHotfixes += $obj
 
        }
}

foreach($RecomendedClusterHotfix in $ClusterHotfixes)
{
        $witness = 0
        foreach($hotfix in $Hotfixes)
        {
                If($RecomendedClusterHotfix.id -eq $hotfix.HotfixID)
                {
                    $obj = [PSCustomObject]@{
                        HyperVNode = $Node
                        HotfixType = "Cluster"
                        RecomendedHotfix = $RecomendedClusterHotfix.Id
                        Status = "Installed"
                        Description = $RecomendedClusterHotfix.Description
                        DownloadURL =  $RecomendedClusterHotfix.DownloadURL
                    } 
                   
                   $listOfHotfixes += $obj
   
                   $witness = 1
                 }
        }  
        if($witness -eq 0)
        {
            $obj = [PSCustomObject]@{
                HyperVNode = $Node
                HotfixType = "Cluster"
                RecomendedHotfix = $RecomendedClusterHotfix.Id
                Status = "Not Installed"
                Description = $RecomendedClusterHotfix.Description
                DownloadURL =  $RecomendedClusterHotfix.DownloadURL
            } 
                   
            $listOfHotfixes += $obj          
        }
}
}
if ($Download){
    foreach($RecomendedHotfix in $HyperVHotfixes){
        if ($RecomendedHotfix.DownloadURL -ne ""){
            Start-BitsTransfer -Source $RecomendedHotfix.DownloadURL -Destination $DownloadPath 
        }
    }
    foreach($RecomendedClusterHotfix in $ClusterHotfixes){
        if ($RecomendedClusterHotfix.DownloadURL -ne ""){
            Start-BitsTransfer -Source $RecomendedClusterHotfix.DownloadURL -Destination $DownloadPath 
        }
    }
}

$listofHotfixes


Live Migrating a VM from Hyper-V 2012 to R2 with PowerShell

After reading about the possibility to Live Migrate between versions and now getting the R2 bits I had to test the migration of a VM from a Hyper-V 2012 enabled host to a newly installed Hyper-V 2012 R2. I have on both the hosts enabled the migration on the hosts with kerberos authentication and also set up delegation.

When starting a migration I got the following error, and it did not tell me what was actually wrong, but after I disconnected the ISO that was connected the migration succeeded nicely!

migratefaildvd

So here is a perfect place for you to check your VM´s for connected ISO´s and disconnect them before migrating and that can easily be done with PowerShell,

Get-VM -ComputerName HV01 | Get-VMDvdDrive | where DVDMediaType -ne None | Set-VMDvdDrive -Path $null
Screen Shot 2013-06-26 at 14.41.57

After this has been done I can continue to migrate the server and that can also be done with PowerShell,

Move-VM -ComputerName hv01 -Name win2k3-01 -DestinationHost hvr2 -IncludeStorage -DestinationStoragePath c:\vms\win2k3-01
Screen Shot 2013-06-26 at 14.44.13

As you can see it now resides on the 2012 R2 server and is still running :-).

When trying to migrate the VM back to the 2012 Hyper-V I get an strange error (yes I know, it is not supported but I had to try!), the error message could have been a bit more informative, and I have tested to set the migration option to just TCP/IP instead of compression but still get the same error message!

migratetoOld2k12

And with powershell I get a bit clearer view of the error message,

Screen Shot 2013-06-26 at 15.44.23

Still some traces of snapshot name in 2012 R2 Hyper-V PowerShell

To align the Hyper-V with System Center VMM Microsoft has changed the Hyper-V manager regarding the snapshots to Checkpoints. I personally had preferred that they changed the naming in VMM to snapshots instead, but that is my opinion and maybe that is because of my background in VMware environments 😛

checkpointsgui

Although the change has been implemented in the GUI, the PowerShell module has not been updated to reflect this as you can see in my next screendump:

Screen Shot 2013-06-26 at 12.52.22

The cmdlet to take a checkpoint is as it has been in the Hyper-V Powershell module in 2012, Checkpoint-VM.

Upgrading Windows Core Hyper-V from 2012 to 2012 R2

This morning I could read that the R2 preview bits was available to download and of course I had to download and install.

I have installed one Win 2012 R2 with GUI and also I have now tried to upgrade my Windows 2012 Hyper-V core server to R2, as you can see on the screendump below, I had some issues to take care of.

Screen Shot 2013-06-25 at 10.17.31

After evicting it from the cluster and also stopping all VM´s I could continue to upgrade the server, it was really fast (now I have SSD and that does make a difference 😛 ) but still, the feeling is that Microsoft have done some work on making the R2 more rapid, the Powershell console is also more alert and responsive when starting it.

Screen Shot 2013-06-25 at 10.29.13

I will continue to evaluate the Preview and there will probably be some more posts about my findings in the R2 release 🙂