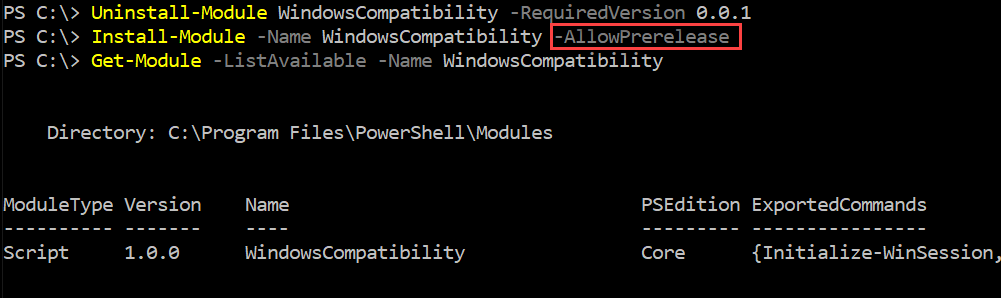
Archive

Archive for the ‘Powershell’ Category

Adding 2016 subnets to AD Sites and Services

May 14th, 2013 No comments

In a recent post I showed how to configure the DHCP server with multiple scopes of subnets with PowerShell and how blazing fast that could be done in the Windows 2012 compared to Windows 2008 R2.

One thing we might forget is to populate the Active Directory Sites and Services subnets with this information to get the clients to access the domain controllers that is nearest. As you can read in this technet post the reason for populating this:

“Domain controllers register service (SRV) resource records in Domain Name System (DNS) that identify their site names. Domain controllers also register host (A) resource records in DNS that identify their IP addresses. When a client requests a domain controller, it provides its site name to DNS. DNS uses the site name to locate a domain controller in that site (or in the next closest site to the client). DNS then provides the IP address of the domain controller to the client for the purpose of connecting to the domain controller. For this reason, it is important to ensure that the IP address that you assign to a domain controller maps to a subnet that is associated with the site of the respective server object. Otherwise, when a client requests a domain controller, the IP address that is returned might be the IP address of a domain controller in a distant site. When a client connects to a distant site, the result can be slow performance and unnecessary traffic on expensive WAN links.”

So as we do not want to update 2016 subnets manually we do this with PowerShell instead, and as you can see with the Windows 2012 it goes quite fast (I have tested on Win 2008 R2 and it works there also).

sitesps

and here is the small PowerShell bits that do the magic

# Populate Subnets in AD Sites and Services
#
# Niklas Akerlund 2013-05-14 

for($b=1;$b -le 63 ; $b++){
    for($i=0;$i -le 255){ 
        $Name = "10.10.$b.$i" + "/29"
        $Description = "10.10.$b.$i" + "/255.255.255.248"
        New-ADObject -Name $Name -Type subnet -Description $Description -OtherAttributes @{location="RemoteVPN";siteObject="CN=HQ,CN=Sites,CN=Configuration,DC=lumademo,DC=local"} -Path "CN=Subnets,CN=Sites,CN=Configuration,DC=lumademo,DC=local"     
        $i = $i +8
    }
}

And then when you look in the Active Directory Sites and Services you will find all the subnets and that they correlate to the right site.
sitesservice

flattr this!

Categories: Powershell, Win2012 Tags:

Upgrading to WMF 3.0 on Win 2008 R2 SP1 Hyper-V Core

April 26th, 2013 No comments

If you still have some Windows 2008 R2 SP1 Core Hyper-V hosts running and thinking of upgrading to WMF 3.0 there has been some problems with the VMM 2012.

I have a Win 2008 R2 Core SP1 Hyper-V  in my VMM 2012 SP1 UR2 and wanted to test if this was still an issue. The main reason for upgrading to the WMF 3.0 is the rebuild of the vmm refresh that is described in this blog post.

First I just tried to run the install file for WMF 3.0 and got the following dialog, and after reading a bit more realizing that it was because I need the .Net 4 as a prerequisite.

notapplicablewmf3

I installed the .Net 4 and there are some things that need to be configured on the Core server before and that is explained on the download page for .Net for Win 2008 R2 SP1 Core

After that It worked to install,

install1wmf3

And after rebooting the host I looked in VMM and also tried some refresh and start/stop on VM´s and setting the host in maintenance mode, everything worked without any issues :-)

hoststatuswmf3

flattr this!

Categories: Hyper-V, Powershell, SCVMM, Virtualization Tags:

Adding 2016 DHCP Scopes with PowerShell in Windows 2012

April 24th, 2013 No comments

I have had a lot to do and that is why I have not done so much updating on the blog, soon my third article will be published on Petri IT Knowledge :-) I have also attended the MMS in Las Vegas where I got loads of good information and meet lots of people!

In this post I want to show you the improvements in Windows 2012 and with the PowerShell native cmdlets in this version.

The task was to automatically create 2016 DHCP Scopes for clients on a DCHP server and every scope was a /29 net with 3 lease addresses and one router for each.

I tested this on a Windows 2008 R2 with the community powershell module  and with the following script it took, and I am not kidding, almost 5 hours!! the module utilise the net sh commands with dhcp and probably there could be a lot of improvements for performance, and seriously, just creating one or two scopes can be done in the gui but doing over 2000 will demand a scripted way!

Screen Shot 2013-04-24 at 19.28.45

# Massive DHCP Scope 2016
#
# Niklas Akerlund 2013-04-24

write-host (get-date)
for($b=1;$b -le 63 ; $b++){
    for($i=0;$i -le 255){ 
        New-DHCPScope -Server localhost -Name 10.10.$b.$i -Address 10.10.$b.$i -SubnetMask 255.255.255.248 | Out-Null
        $startip = $i+2
        $endip = $i+4
        $router = $i+1
        Add-DHCPIPRange -Server localhost -Scope 10.10.$b.$i -StartAddress 10.10.$b.$startip -EndAddress 10.10.$b.$endip | Out-Null
        Get-DHCPScope -Server localhost -Scope 10.10.$b.$i | Set-DHCPOption -OptionID  003 -DataType IPADDRESS -Value 10.10.$b.$router | Out-Null
        $i = $i +8
    }
}
write-host (get-date)

With the PowerShell DHCP module for WIndows 2012 I have created the following script for creating the same amount of scopes and configuration and running it took only about 1 minute!!

Screen Shot 2013-04-24 at 20.02.35

# Massive DHCP Scope 2016
#
# Niklas Akerlund 2013-04-24

write-host (get-date)
for($b=1;$b -le 63 ; $b++){
    for($i=0;$i -le 255){ 
        $startip = $i+2
        $endip = $i+4
        $router = $i+1
        Add-DhcpServerv4Scope -Name 10.10.$b.$i -StartRange 10.10.$b.$startip -EndRange 10.10.$b.$endip -SubnetMask 255.255.255.248
        Set-DhcpServerv4OptionValue -ScopeId 10.10.$b.$i -Router  10.10.$b.$router
        $i = $i +8
    }
}
write-host (get-date)

As you can see, handling lots of changes and configurations can easily be done in the new Windows 2012 and it´s native cmdlets!

flattr this!

Categories: Powershell, Win2012 Tags:

Manage your Clouds with PowerShell ppt and demofiles

April 4th, 2013 No comments

Today I was presenting on the Technet Sweden Live meeting:System Center Sp1 Springtime series and my session was about:

manageclouds


The presentation can be downloaded on the following link -> SC2012SP1VarenPSClouds and I have also added it to slideshare

I also promised that the powershell files I have created for the demonstrations would be downloadable and here they are, I have made one file for each of the cloud management parts

You can also read some of my other posts about App controller and how to add clouds to it, also the post about how to extend your VMM console with custom properties and also how to download and update help in SCVMM.

I will try to get some time to make some demo movies and publish them in a near future :-)


flattr this!

Categories: Powershell, SCVMM, Virtualization Tags:

Adding Clouds to SC App Controller 2012 SP1 with PowerShell

March 28th, 2013 No comments

Last post I did was about how to get the connection to an remote SC App Controller Server with the SCAC PowerShell module.

Now I will show you how to add your Private and Public Cloud to your App Controller with the PowerShell cmdlets.

First off I will add my SC VMM server, and as you can see I first connect to the App Controller and then add the VMM server.

AddVMM

I do not know if it is my silverlight that has some issues or, but the web console did not reflect the addition of the VMM Server until I logged of and then on the App Controller portal

VMMingui

PS C:\> Add-SCACCloudSystem -VMM -Name VMM2012 -ServerName vmm2012.lumademo.local -Port 8100

Then I will add my Azure account and that is done by adding an subscription, here you will need the certificate with the private key for the management certificate that you uploaded to your Azure subscription. And yes I have cluttered out the password and subscription Id in the screendump so it is not your monitor that broke ;-)

AddAzure

Azuregui

PS C:\> Add-SCACAzureSubscription -Name vNiklas -Id your-azure-subscription-id -ManagementCertificatePath C:\temp\certazure.pfx -ManagementCertificatePassword (ConvertTo-SecureString -AsPlainText "YourCertPassword" -Force)

Pretty easy and now I have two clouds in my App Controller, I can also add a SPF cloud connection from a third party vendor to get a truly hybrid cloud, that I have not set up yet though so it will have to be in another post.

flattr this!

Categories: Powershell, SCVMM, Virtualization Tags:

Using SC App Controller 2012 SP1 PowerShell module remote

March 26th, 2013 2 comments

Today I have been exploring the System Center App Controller 2012 SP1 and the PowerShell module that it has.

There is not so many cmdlets in this but maybe it is enough… will find out soon :-)

Screen Shot 2013-03-26 at 20.55.51

One cmdlet that is necessary is the Get-SCACServer if you are running the powershell module remote. Here comes the small problem when like me not using a certificate from a trusted CA like the AD CS or bought by a small amount of $$$ from verisign or other vendor of certs. As you can see on the next screendump I get a small error that the cmdlet does not like the certificate, well as there is no -force parameter on the cmdlet I went for another aproach and I added the self-signed cerificate from the App Controller server that was used in the IIS to the trusted root certificate authorities certificate store in the cert manager on the Management machine where I wanted to run the appcontroller PowerShell module. And now the cmdlet did not complain and I could get the App Controller server :-)

Screen Shot 2013-03-26 at 21.43.22

Here you can see where I added the cerificate,

Screen Shot 2013-03-26 at 21.59.48

When using the App Controller PowerShell module locally on the same server as the App Controller Server resides this trust of the cert is already taken care of :-)

A good post on how to create your own certificates for example using in management of your Azure or your IIS SSL you can find here on this link.

flattr this!

Categories: Powershell, SCVMM, Virtualization Tags:

Downloading help for SC VMM 2012 SP1 PowerShell module

March 25th, 2013 No comments

Today I wanted to use the help in SC Virtual Machine Manager PowerShell console and found that I had to download the updated help before I could see the whole, and of course I tried to do that but encountered the little error that follows in the screendump as you see,

Screen Shot 2013-03-25 at 10.35.55

I had used the PowerShell shortcut in the VMM Console, and was using my own login account, It is part of administrators/domain admins but still had not proper rights on the VMM server.

Screen Shot 2013-03-25 at 19.59.53

I opened a new PowerShell console by right click on the shortcut on the taskbar and chose Run-As Administrator and typed:

Screen Shot 2013-03-25 at 20.03.07

Import-Module virtualmachinemanager
Update-Help -Module virtualmachinemanager

And now I can see the full help :-)

Screen Shot 2013-03-25 at 19.56.52

flattr this!

Categories: Powershell, SCVMM, Virtualization Tags:

Failover Cluster not updated after vm storage migration in VMM 2012 SP1

March 19th, 2013 No comments

I was talking to a customer today about an issue they had with their SC VMM 2012 SP1 and when they where doing some storage migrations between their CSV SAN volumes in the Hyper-V cluster.

Screen Shot 2013-03-19 at 22.24.56

Move-SCVirtualMachine -VM (Get-SCVirtualMachine VMtest) -VMHost (Get-VMHost HV02) -Path "C:\ClusterStorage\Volume2" -UseLAN

Everything looks good inside VMM and also the VM works nicely but when looking at the failover cluster manager the resource is not updated which resulted in failure in backup with DPM and probably more issues.

Here is a screendump of the VM in failover cluster manager and also an screendump of the VM in VMM after the migration, as you can see these values does not match

Screen Shot 2013-03-19 at 20.24.47

Screen Shot 2013-03-19 at 20.57.09

There is a way to solve this but that will mean that we have to use the failover cluster and Hyper-V cmdlets. Also should be noted that if we use the failover cluster manager it works so it is a bug in VMM.

So I opened a new PowerShell console and typed the following:

Get-VM VMtest -ComputerName HV02 | Update-ClusterVirtualMachineConfiguration -Cluster HVCL30

And here you can now see that the cluster resource reflects the right data

Screen Shot 2013-03-19 at 22.40.42

There is actually one more solution and that is to remove the VM from the cluster and then add it again but it is easier to just update the cluster virtual machine configuration :-)

On the management computer I always install the RSAT tools for Hyper-V and also Failover Cluster along with the VMM console to be able to do all management from one place even if I cannot do it all in VMM.

flattr this!

Updated Move-VMStorage2 function for Hyper-V PowerShell

February 26th, 2013 1 comment

I have been updating my function that extends the Hyper-V PowerShell module cmdlet Move-VMStorage. A while ago I made a blog post about that I think that the folders on the source directory should be removed when doing a Live Storage Migration or you will get a mess with empty VM folders after a while and that can cause some confusion for the admins.

The updates in this script function are the following:

  • I will not delete folders if they do not reside within a folder with the VM´s name (In the earlier version I just deleted and that recursive with no questions asked which could have some consequences )
  • And if the folder was the default or named with another name you will get an output that tells you to clean manually
  • If you do not give the VM´s Name in the -Path parameter I will add that for you to get a nice and tidy folder structure

Here is a screendump on the updated function in action

move-vmstorage2

And here you can see what happens if I move from a folder that is not named after the VM´s name

manuallyclean

And here is a screendump of the folders that are left in the c:\vms that you need to manually delete and you might want to check that not another vm is residing inside these folders before removing them :-P

foldersbehind

    <#
    .Synopsis
       An updated Move-VMStorage function
    .DESCRIPTION
       To also remove the folder where the VM was residing this function also deletes the folder after moving the VM
       This function also helps you in creating a folder in the path if forgotten
    .EXAMPLE
       Move-VMStorage2 -VMName test -ComputerName HV02 -Path \\SMB-srv01\VMs\test
    .NOTES
    Author: Niklas Akerlund 20130226
    Version: 0.2
    #>
    function Move-VMStorage2
    {
        [CmdletBinding()]
        [OutputType([int])]
        Param
        (
            # A name of a VM
            [Parameter(Mandatory=$true,
                       ValueFromPipelineByPropertyName=$true,
                       Position=0)]
            $VMName,
            # The name of the Hyper-V host
            [Parameter(Mandatory=$false,
                       ValueFromPipelineByPropertyName=$true,
                       Position=1)]
            $ComputerName = "localhost",
            # The path where the VM is going to be relocated to.
             [Parameter(Mandatory=$true,
                       ValueFromPipelineByPropertyName=$true,
                       Position=2)]
            [string] $Path
        )
    
            # Lets move and tidy the source folder
            $VM = Get-VM $VMName -ComputerName $ComputerName
            # For some reason the path does not get refreshed when moving one VM several times in the same console that is why i do a select *
            $VMOldPath = Get-VM $VMName -ComputerName $ComputerName | select * -ExpandProperty Path 
                    
            if ($Path -notmatch $VM.VMName){
                $Path = $Path + "\" + $VM.VMName
                Move-VMStorage -VM $VM -DestinationStoragePath $Path
            }else{
                Move-VMStorage -VM $VM -DestinationStoragePath $Path
            }
            
            if (($VMOldPath.StartsWith("\\")) -and $VMOldPath -match $VM.VMName) {
               Remove-Item -Path $VMOldPath -Recurse -Force
            }elseif ($VMOldPath -match $VM.VMName){
                Invoke-Command -ComputerName $VM.ComputerName -ScriptBlock {Remove-Item -Path $Using:VMOldPath -Recurse -Force}
            }else{
                Write-Host "The VM :" $VM.VMName " was in the following path " $VMOldPath " Clean it manually!"
            }
            
    }

flattr this!

Categories: Hyper-V, Powershell, Virtualization, Win2012 Tags:

Windows 8 Client Hyper-V and exchanging files with PowerShell

February 24th, 2013 No comments

Ben the Virtual PC Guy did a blog post a while ago where he showed how to get files out of a running machine, and I made a follow up where using a non Hyper-V host to get the files.

Today I read on a forum that they where discussing how to get a folder and the files from a virtual machine running on Windows 8 client Hyper-V by enabling and fiddeling with the network. In some cases you do not want to enable networking on that guest to the Win8 host and then you can use the way that Ben showed.

Or you can use an VHD that you first connect to the Win8 host and then copy the files and when you are done you can disconnect it from the host machine and connect it to the virtual machine, with this approach instead of the snapshot you can also add files from the host to the virtual machine and the other way around.

So With PowerShell I first create an VHD and mount it to the Host, create a partition and format it and then I copy the data I want to transfer and then also mount it to the VM.

Screen Shot 2013-02-24 at 20.59.13

New-VHD -Path c:\temp\MobileData.vhdx -Dynamic -SizeBytes 10GB | Select-Object Path | Mount-VHD
Get-Disk | where PartitionStyle -eq "RAW" | Initialize-Disk -PartitionStyle MBR -PassThru | New-Partition -UseMaximumSize -AssignDriveLetter -MbrType IFS | Format-Volume -Confirm:$false | Select-Object DriveLetter | ft -AutoSize
Copy-Item C:\ToVM -Destination E:\ -Recurse
Dismount-VHD C:\temp\MobileData.vhdx
Add-VMHardDiskDrive -VMName VMTest -Path C:\temp\MobileData.vhdx -ControllerType SCSI -ControllerNumber 0 -ControllerLocation 0

As you might know, why I use the SCSI controller is to be able to hot-add the virtual hard disk to the VM while it is running and not having to shut it down :-)

The first time in the VM I have to do some massage on the disk before it appears but the next time the VM´s OS recoginize it and it can be used directly.

Screen Shot 2013-02-24 at 22.42.42

Get-Disk | where OperationalStatus -eq "Offline" | Set-Disk -IsReadOnly $false
Get-Disk | where OperationalStatus -eq "Offline" | Set-Disk -IsOffline $false
New-Item -Path E:\ToVM\ToHost -Type directory

And as you can see in the screendump above of the virtual machines folder with the files and also you can see that I can add data inside the VM to my virtual disk. If I would just use the Set-Disk -IsOffline $false I would get a volume that was write protected and here I wanted to add files and folders from the virtual machine also.

And when I am done moving files I can easily disconnect the disk from the VM from the host by using the following PowerShell cmdlet

Screen Shot 2013-02-24 at 22.06.39

Remove-VMHardDiskDrive -VMName VMTest -ControllerType SCSI -ControllerNumber 0 -ControllerLocation 0

This move folder and files way also works on the Windows 2012 Hyper-V!

Looking at the features in the Virtual PC compared to the client Hyper-V there are at lest two features I miss in the later,

  • Easily copying files between virtual machine and host
  • An network that can share the hosts without any extra manual configuration with the bridging creating a NAT solution out of the box.

Well you can´t get everything you wish for and some things you can create workarounds for :-)

flattr this!

Categories: Hyper-V, Powershell, Virtualization, Win8 Tags: