SCVMM DB Backup and cleaning with PowerShell

I have been working on some Virtual Machine Manager deployment and configuring at a customer and after some configuration and misstakes a backup would have been nice. There is a PowerShell cmdlet in the VMM and what it does is to create a DB dump on a path that you specify. Remembering to do this every day that you work with the environment so you can recover is not always so easy and it is often that just after you make a misstake or the system does it for you, the need for backup arrises.

So setting it up with a scheduled job in PowerShell is the way to go, and the script I have also removes the backups after 7 days.

here is the simple script that does the backup and cleaning

# Backup VMM Server
#
# Schedule with either PSScheduledJobs or Task manager
# Niklas Akerlund 2013-06-04
$backupPath = "C:\temp"

ipmo virtualmachinemanager
Backup-SCVMMServer -Path $backupPath

get-item -Path "$backupPath\*" | where {$_.LastWriteTime -lt (get-date).AddDays(-7) -and $_.Name -match "bak"} | Remove-Item

And here is the scheduling that is done with PS Scheduling

backupschedule
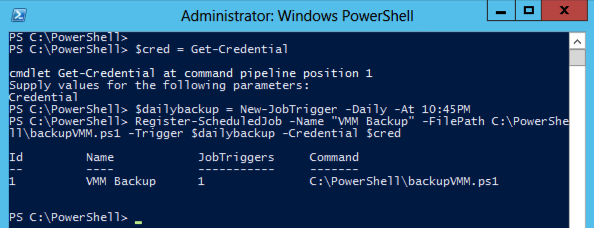
$cred = Get-Credential
$dailybackup = New-JobTrigger -Daily -At 10:45PM
Register-ScheduledJob -Name "VMM Backup" -FilePath C:\PowerShell\backupVMM.ps1 -Trigger $dailybackup -Credential $cred

This way you at least have a backup once a day to get you to recover, and talking of recover, if you want to recover the database for the VMM you can use the binary SCVMMRecover.exe and the parameter -Path. You can find the SCVMMRecover in the following path if the VMM is installed with default settings,  “C:\Program Files\Microsoft System Center 2012\Virtual Machine Manager\bin”

SysCtr PDT deployment session on PSUG Sweden

Yesterday I was at the Swedish PowerShell User Group Community Day and I had a session about the System Center and deployment with PowerShell and talked about the PowerShell Deployment Toolkit.

Here is a screendump where I have installed VMM, AC,ORCH,SM,DPM,OM and also as you can see the automatic creation of shortcuts both on the desktop and the taskbar on the server that I have configured for console. As the PDT is designed to not kill itself I had to restart the deployment after rebooting the HV03 (the reason for this was the installation of .Net 3.51 which required the reboot) which was also the server running the deployment and the last part took 9 minutes. In a youtube video you can see how the deployment takes about an hour with the whole system center suite of roles and integrations between them, quite amazing!

finishedpdt

One thing that is wrong in the package of PDT is the size of the Microsoft.Windows.Server.Library.mp so when the installer.ps1 is validating the size of the files the validation fails. This mp is not wrong it is just updated. Edit the workflow.xml file and set the right size and you should be fine.

Screen Shot 2013-05-24 at 13.17.00

In the workflow.xml file find the line and update the size to the correct value

Screen Shot 2013-05-24 at 13.45.24

I have created a small scripted file that creates all the AD accounts in the PDT as this is not included. This also create an OU that it puts all objects in so it will be more manageable and easy to find.

# Add all Accounts nesssesary for SC Deploy with PDT
#
# Niklas Akerlund

# Create OU´s for groups, users and Server objects
$OU = New-ADOrganizationalUnit -Name SCPDT -PassThru
$SAccounts = "installer","vmm","or","spf","ac","om_saa","om_das","om_dra","om_dwa","sm_s","sm_w","sm_r","sm_a","sm_p"

foreach ($Account in $SAccounts){
    #Account creation  
    New-ADUser -Name $Account -SamAccountName $Account -AccountPassword (convertto-securestring -string "LUMA15gate" -asplaintext -force) -PasswordNeverExpires $true -Enabled $true -path $OU
    get-adgroup "domain admins" | Add-ADGroupMember -Members (Get-ADUser $Account)

}
# rest of admin groups and stuff
New-ADGroup -Name SPFAdmins -path $OU -GroupScope Global -GroupCategory Security
New-ADGroup -Name SM_PDT -path $OU -GroupScope Global -GroupCategory Security
New-ADGroup -Name DW_PDT -path $OU -GroupScope Global -GroupCategory Security
New-ADGroup -Name SMAdmins -path $OU -GroupScope Global -GroupCategory Security
New-ADGroup -Name SQLAdmins -path $OU -GroupScope Global -GroupCategory Security
Get-ADGroup "SQLAdmins" | Add-ADGroupMember -Members (Get-ADgroup "domain Admins")

SC Orchestrator 2012 Sp1 and VMware vSphere 5.1

I have been exploring the System Center Orchestrator Integration Pack for vSphere and this is some good stuff! I have several customers that have bought Windows Datacenter Licenses with the System Center bundle and that is quite beneficial from a economical perspective! This means that they can use the System Center all parts with all VM´s and hosts. Several customers also use VMware vSphere as their virtualization platform and they can use System Center Orchestrator to build automation without any extra license cost.

In the System Center family there is only Virtual Machine Manager and Orchestrator that has connections to VMware vSphere without third party software (In Operations Manager you can use SNMP to get alarms from vCenter though).

So what can we do with Orchestrator IP for vSphere? This is the activities that is in the pack with version number 7.1.3010:

Screen Shot 2013-02-17 at 18.47.24

And what do we need to configure, well of course we need connection settings to a vCenter server and that is found under the “Options” and then you add your vCenter or if you have several and want to use them you will have to add one configuration for each.

Screen Shot 2013-02-17 at 19.12.05

And here is an simple example of a runbook that changes all VM´s memory to 384 MB, in the runbook I check if the VM is on or off and do an graceful power off activity depending on that status. For each activity in the runbook we have to add what configured vCenter we want to use or the runbook will fail!

Screen Shot 2013-02-17 at 19.19.42

The possibilites are almost endles as you can combine these activitiy with the others and interact with for example SCCM and deploy VM´s and OS. If this list of activities in the IP is not enough it can be extended by either creating your own IP or calling PowerCLI scripts from your runbook. Together with System Center Service Manager we can build nice self service portals that also does stuff on the VMware VM´s based on what the user order.

Download all SC 2012 SP1 Evaluation VHD files with PowerShell

I was going to download the evaluation VHD´s for System Center 2012 SP1 and doing that the manual way by clicking on each of the links on the download pages and that for all SC 2012 products could seriously give you mental illness, If I counted the files correct it is 99 total + documents.

Screen Shot 2013-02-04 at 20.11.43

I found this guest post on the ScriptingGuys page where Marco did a PowerShell line how to not only find the files but also add them to BITS for download.  This script only works on PowerShell v3.0 because it is using the new Invoke-WebRequest cmdlet, and as you can see on the screendump how easily you can get all download links.

Screen Shot 2013-02-04 at 21.12.20

I have set the new url´s for SC 2012 SP1 RTM eval vhd´s  and added the .docx files and also do a check that in the volume you will store them have enough space, I made the assumption that it is approximately 70 GB total (99 files * ~700 MB each)

Here You can copy this and run on your environment, It will take some hours but at least it saves you the time in clicking 😛

# Download all SC 2012 SP1 VHD Eval
#
# Niklas Akerlund / Lumagate 2013-02-04
#

# Downloadfolder
$Dest = "D:\VHDEVAL"
$SizeOfSCSP1 = 70GB

# Get Space on volume
$SpaceRemaining = (Get-Volume $Dest.Split(":")[0]).SizeRemaining

if($SpaceRemaining -gt $SizeOfSCSP1){
# SCVMM
((Invoke-WebRequest -Uri "http://www.microsoft.com/en-us/download/details.aspx?id=36435").links | ? href -match "rar$|exe$|docx$").href | %{Start-BitsTransfer -Source $_ -Destination $Dest}
# SCOM
((Invoke-WebRequest -Uri "http://www.microsoft.com/en-us/download/details.aspx?id=36424").links | ? href -match "rar$|exe$|docx$").href | %{Start-BitsTransfer -Source $_ -Destination $Dest}
# SCORCH
((Invoke-WebRequest -Uri "http://www.microsoft.com/en-us/download/details.aspx?id=36426").links | ? href -match "rar$|exe$|docx$").href | %{Start-BitsTransfer -Source $_ -Destination $Dest}
# SCAC
((Invoke-WebRequest -Uri "http://www.microsoft.com/en-us/download/details.aspx?id=34781").links | ? href -match "rar$|exe$|docx$").href | %{Start-BitsTransfer -Source $_ -Destination $Dest}
# SCDPM
((Invoke-WebRequest -Uri "http://www.microsoft.com/en-us/download/details.aspx?id=36423").links | ? href -match "rar$|exe$|docx$").href | %{Start-BitsTransfer -Source $_ -Destination $Dest}
# SCCM
((Invoke-WebRequest -Uri "http://www.microsoft.com/en-us/download/details.aspx?id=36428").links | ? href -match "rar$|exe$|docx$").href | %{Start-BitsTransfer -Source $_ -Destination $Dest}
# SCSM
((Invoke-WebRequest -Uri "http://www.microsoft.com/en-us/download/details.aspx?id=36427").links | ? href -match "rar$|exe$|docx$").href | %{Start-BitsTransfer -Source $_ -Destination $Dest}
}else{
[int]$Sum = ($SizeOfSCSP1 - $SpaceRemaining)/1GB
Write-Host "Free up at least $Sum GB and try again!"
}

Upgraded from SC 2012 SP1 Beta/CTP to SP1 RTM

I have today tested to upgrade the Beta/CTP version of SC 2012 SP1 to the newly released SP1 RTM version for

  • SC Orchestrator
  • SC Virtual Machine Manager
  • SC Operations Manager (Community Technology Preview)

As the articles on technet tells you it is not supported but I wanted to try and see how I could do it in my lab environment and what consequences it would have . I have one DC Server, one VMM/ORCH/SCOM server (maybe not best practice to have all three roles on the same server but it works 😀 ) and one Hyper-V host with some lab-VM´s

I started with the Orchestrator and when I connected the ISO to the server/servers and try to install I got an dialog that I already have it installed, but it is the wrong version so I have to uninstall everything first, So did that and then during the installation selected the old DB in the wizard and after that I could see all my runbooks and IP´s still are there.

Screen Shot 2013-01-22 at 16.32.16

Then It was time for the SC VMM, but now the installation guide clearly told me that I had to uninstall the product, although as you can read on the screen dump: if I am running SC 2012 I can retain the database when uninstalling.

Screen Shot 2013-01-22 at 14.05.14

In the uninstall wizard, be sure to check this box:

Screen Shot 2013-01-22 at 14.10.51

And then during the new installation be sure to point out the old database

Screen Shot 2013-01-22 at 14.14.02

The installation wizard will then check and ask if you want to upgrade it, pretty nice and for not supporting an upgrade they have made it quite easy to do it anyway!

Screen Shot 2013-01-22 at 14.14.19

Also, the wizard recognizes the library share that I had configured before. In the last step I get an summary that tells me what potential issues might occur with this upgrade, As you can read in the first part it is important to use the same server as the vmm was installed on before and that you use the same service account for VMM this for the Run-As accounts to work!

Screen Shot 2013-01-22 at 14.17.29

When the installation is complete I had to update the Agent on the Hyper-V host.

Screen Shot 2013-01-22 at 14.25.07

After this I continued to upgrade the SCOM, when starting the installation wizard I did not need to uninstall anything and right away the SCOM accepted an upgrade to the RTM version.

Screen Shot 2013-01-22 at 15.01.04

After successfully “upgrading” these components there are some more work that needs to be done, such as the SCOM-SCVMM integration that need upgrading and also Orchestrator IP that should be taken care of but that in another blog post 🙂

Getting files out of a running VM in Hyper-V 2012 remotely

I was reading the post by Ben Virtual-PC Guy about how to get files out of a running virtual machine.

I have altered his bits to work also when not running on a Hyper-V host (as Mount-VHD does not work when not Hyper-V is enabled), and you have the VM´s on a smb share, this also works if you take a snapshot and then copy the vhdx file to a windows 8 or windows 2012 machine.

The cool part is that I can use a UNC share path with Mount-DiskImage which is the Cmdlet used.

If I have the right permissions I can then easily with just a PowerShell script as Ben showed mount the virtual harddisk and copy the files, and this from a remote server and not on the Hyper-V host.

Screen Shot 2013-01-09 at 23.28.25
Get-VM core -ComputerName hv01 | Checkpoint-VM -SnapshotName "Need to look at these disks" -Passthru | %{Get-VHD -VMId $_.vmid -ComputerName $_.ComputerName} | %{Mount-DiskImage -ImagePath $_.ParentPath -Access ReadOnly -PassThru}

After I have run this you see that I can then get the secret file out of the running virtual machine

Screen Shot 2013-01-09 at 16.35.22

and when I am finished copying the secret files from the running virtual machine I can unmount the disk and remove the snapshot.


Screen Shot 2013-01-09 at 23.29.26
PS C:\> Get-VM Core -ComputerName HV01 | Get-VMSnapshot | %{Get-VHD -VMId $_.vmid -ComputerName $_.ComputerName; Remove-VMSnapshot -VMName $_.VMName -ComputerName $_.ComputerName} | %{Dismount-DiskImage $_.ParentPath -PassThru}

So what is the conclusion on this in a security perspective, as you can see it is quite easy for a person with the right permissions on a host level to get access of files that he or she maybe not should see. Talented hackers can get permissions and accounts that they need. This leads to the discussion of course where you should put your hosts, is it enough security and boundaries on your network and in your Active Directory Domain or should you set up another for the Hyper-V hosts and management servers?!

Populate your own custom properties on SC VMM 2012

I have been helping a customer to populate their VMM 2012 console with information that they think is good to have, I have made a blog post about this some time ago but now I have added some new valuable information.

The information I retrive are where the VM resides on what CSV volume, if the VM has dynamic VHD´s, if the VM has snapshots and if the snapshots also have been merged, this can only happen when the VM is in Saved State or Stopped on a Win 2008 R2 Hyper-V (this is not an issue on a win 2012 hyper-v as it can live merge)

First I add the Custom Properties

New-SCCustomProperty -Name "DynamicVHD" -AddMember "VM"
New-SCCustomProperty -Name "Snapshots" -AddMember "VM"
New-SCCustomProperty -Name "Datastore" -AddMember "VM"

Here is a screenshot how it looks when you add the custom properties to the console,

Screen Shot 2012-12-17 at 19.41.55

In the powershell script I iterate down through all the snapshots/differencing disks to the parent VHD and check if that is fixed or dynamic. And as you see in the image I check if there is a snapshot or a removed but not merged snapshot (I still have a small problem with the VMM name Checkpoint 😉 )

# Update custom items Snapshots and Dynamic disks, Datastore
#
# Niklas Akerlund / Lumagate 2012-12-17
if (-not (Get-Module virtualmachinemanager)) {
    Import-Module virtualmachinemanager
}
Get-SCVMMServer -ComputerName localhost | Out-Null

$VMs = Get-VM 

foreach ($VM in $VMs){
    $Datastore = " "
    $LocationProp = Get-SCCustomProperty -Name "Datastore"
    $SnapShots = Get-SCCustomProperty -Name "Snapshots"    
    $VHDs = $VM | Get-VirtualHardDisk
    $DynDisk = Get-SCCustomProperty -Name "DynamicVHD" 
    $Dyn = $false
    $Merge = $false
    
    foreach ($VHD in $VHDs){
        
        if ($VHD.VHDType -eq "DynamicallyExpanding"){
            $Dyn = $true
        }
        if (($VHD.Location -like "*.avhd") -and (($VM | Get-SCVMCheckpoint) -eq $null)){
                $Merge = $true
        }
        $VHDp = $VHD
        while ($VHDp.ParentDisk -ne $Null){
            $VHDp = $VHDp.ParentDisk
            if($VHDp.VHDType -eq "DynamicallyExpanding"){
                $Dyn = $true
            }
           
        }
               
    }
    # Update custom values
    $Datastore = $VM.Location.Split("\")[2]
    Set-SCCustomPropertyValue -InputObject $VM -CustomProperty $LocationProp -Value $Datastore
    if ($Dyn){
        Set-SCCustomPropertyValue -InputObject $VM -CustomProperty $DynDisk -Value "Yes" 
    }else{
        Set-SCCustomPropertyValue -InputObject $VM -CustomProperty $DynDisk -Value "No" 
    }
    
    if ($VM | Get-SCVMCheckpoint){
        Set-SCCustomPropertyValue -InputObject $VM -CustomProperty $SnapShots -Value "Yes"
    }elseif($Merge){
        Set-SCCustomPropertyValue -InputObject $VM -CustomProperty $SnapShots -Value "Not Merged"
    }else{
        Set-SCCustomPropertyValue -InputObject $VM -CustomProperty $SnapShots -Value "No"
    }
    
}

As I described in the earlier post you can schedule this to run with scheduled tasks and maybe set it to run every hour or what ever you might prefer.

Schedule Hyper-V VM replication for non-office hours with PowerShell

If you have set up Hyper-V replica and are replicating your VM´s to a disaster site or maybe a branch office and that office might have a small WAN connection to the datacenter and you cannot get a faster connection from the ISP and for example you might want to stop the replication during the office hours and resume it on the night you can use the new Powershell version 3 feature scheduled jobs.

This will of course imply on your recovery when there was a disaster. But this can be compared to having an offsite DPM server that you sync to every 24 hours.

Anyway, if you want, you can enable a scheduled job that suspends and resumes a VM replication. I created earlier a blog post about setting up scheduled jobs. The following Cmdlets am I using in this case:

  • Suspend-VMReplication
  • Resume-VMReplication

A simple example, I have a VM that I am currently replicating and want it to be suspended during the day and then resumed when all my users have gone home and I have all bandwidth again.

First I add a replication receiver host for my replicated servers

PS C:\> Set-VMReplicationServer -ComputerName HV02 -ReplicationEnabled $true -AllowedAuthenticationType Kerberos -ReplicationAllowedFromAnyServer $true -DefaultStorageLocation c:\VMs

And then I need to set up the VM replication

PS C:\> Enable-VMReplication -VMName Brun12 -ReplicaServerName HV02.vniklas.com -ReplicaServerPort 80 -AuthenticationType Kerberos -ComputerName HV01.vniklas.com

PS C:\> Start-VMInitialReplication -VMName brun12 -ComputerName HV01

So How do I schedule then, as you can see on my screendumps, I have used other times for my scheduled jobs than you might want in your environment, you can also use other parameters than -Daily . Use Get-Help New-JobTrigger -full to get the help and there you can see all the options

PS C:\> $cred = Get-Credential

PS C:\> $dailystop = New-JobTrigger -Daily -At 14:10
PS C:\> Register-ScheduledJob -Name StopRepl -ScriptBlock { Suspend-VMReplication -VMName Brun12 -ComputerName HV01 } -Trigger $dailystop -Credential $cred

PS C:\> $dailystart = New-JobTrigger -Daily -At 14:15
PS C:\> Register-ScheduledJob -Name StartRepl -ScriptBlock { Resume-VMReplication -VMName Brun12 -Resynchronize -ComputerName HV01 } -Trigger $dailystart -Credential $cred

And here on this screendump you can see that it works,

Another minor detail, If you have a VM that changes lot of data on the virtual disks during the day, it will take a while for the resyncing after a longer suspension.

Using the SC Orchestrator 2012 Sp1 to handle Azure

After I had installed and configured the System Center Orchestrator 2012 SP1 I wanted to evaluate and test how it works to create runbooks for my Azure subscription

As you can see on this link the prerequisite to get this working is

  • System Center Orchestrator 2012 SP1
  • Azure (well kind of obvious or? ;-))

Also to get the connection working to Azure we need a x.509 certificate that we upload to the management site. The first x.509 certificate I tested did not work. Then I created one with another trial certification tool

The only thing that was negative with this tool, the cert is only valid for one month. I will make a cert with openssl instead but that another time!

When I have uploaded the certificate in the Azure Management site it looks like this,

So now when I had a certificate I can configure the Orchestrator, I need the password for the .pfx and then also the path as you can see in the configuration dialog, and last but not least the subscription ID for my Azure subscription.

Then we are prepared for the creation of a Azure Runbook. In this technet page you can see what we can do with the IP for Azure. My first example is very simple, I look for a specific VM role and start that one just to see that I can connect and execute stuff in the cloud, and as you can see I successfully find my VM and started it.

One thing that was not totally clear was the different properties that was to be entered, If I omitted one of the properties or entered a wrong value I got an error.

Now I have a trial subscription but if you have a paid plan one of the ideas of a runbook could be that you start or shut down some VM´s  at different times when you are using them. Each Visual Studio with MSDN license (except the test) that you buy have Azure compute hours that can be used and then of course you do want to have a bit control of them, and one way could be with SC Orchestrator or via Powershell cmdlets for Azure.

Some PowerShell and Windows Hyper-V 2012, find VM´s not connected

Digging around in the powershell module for Hyper-V have given me some ideas on what you can do.

Have you ever wondered about if you have a VM that is not connected to any network?

First you use the script part I showed in an earlier post, how to find Hyper-V servers in your AD :

$VMhosts = Get-ADObject -Filter 'Name -like "*Hyper-V"' | %{$_.DistinguishedName.Split(",")[1].replace("CN=","") }

And then you can run the following to list all VM´s that are not connected to any virtual network

$VMhosts | %{ Get-VM -ComputerName $_ | Get-VMNetworkAdapter | where SwitchName -eq $null}

In this little screendump you can see for all my Hyper-V hosts what VM´s without a network connection, you can also easily change the -eq $null to a switch name and then get what VM´s are connected to that particular virtual switch on all your hosts

good luck 🙂