Resizing VHDX´s on running VM´s in Windows 2012 R2 Hyper-V
As I described in an earlier post about why you should think about creating VM´s with Windows 2012 now when the Windows 2012 R2 have arrived I have now tested the online VHDX resize function.
And as I already have emphasized is that you can only online resize VHDX´s that are connected to a SCSI controller, and it is only on Generation 2 VM that your Hyper-V VM´s can have the boot disk connected to the SCSI and also that limits the number of OS´s (Windows 2012/2012R2 and Win 8/8.1)
I have not yet successfully migrated a Gen 1 VM´s system disk to a Gen 2 but I am working on it 😛 (the Gen 2 uses UEFTI and GPT) and some kind of backup/restore will probably be required.. I will post updates in my pursue of this task.

In the following part of this post I want to show you how I resize both a VHDX with the system and boot partition on it and an additional VHDX with data on the VM running on the Generation 2.
As you can see with this PowerShell I can easily extend the VHDX and also with the following command I can get the minimum size that I can shrink it to, this depends on the volume inside and that can also be shrunk online of course, that has been possible since Windows 2008. I have also gone through this case in an earlier post, the main difference here with R2 is that it can be done online.
When checking the help for the Hyper-V PowerShell module in R2 it can be noted that the help information has not been updated as it says still that it is an offline operation 😛

So to resize during the VM is running is shown here in the following screendump, and as you can see, both the system drive and the L-drive are extended.
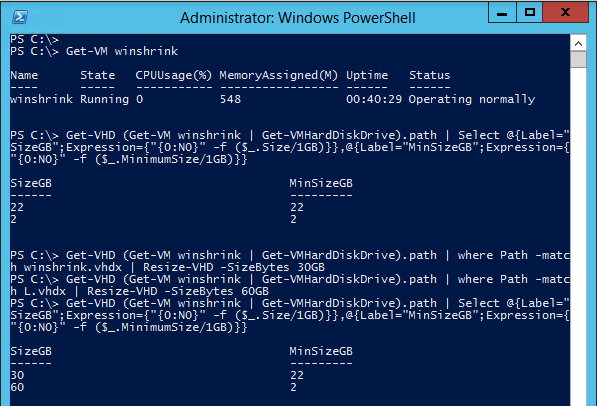
And here you can see how we can shrink the VHDX also, note that I have extended the system volume with 3 GB inside the VM also so the minimum have gone up all this when the VM was running!
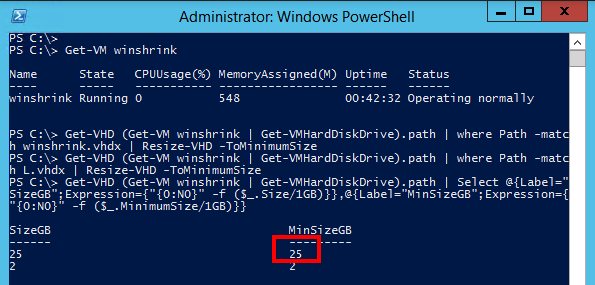
Here is the Powershell
Get-VHD (Get-VM winshrink | Get-VMHardDiskDrive).path | Select @{Label="SizeGB";Expression={"{0:N0}" -f ($_.Size/1GB)}},@{Label="MinSizeGB";Expression={"{0:N0}" -f ($_.MinimumSize/1GB)}}

Get-VHD (Get-VM winshrink | Get-VMHardDiskDrive).path | where Path -match winshrink.vhdx | Resize-VHD -SizeBytes 30GB

Get-VHD (Get-VM winshrink | Get-VMHardDiskDrive).path | where Path -match L.vhdx | Resize-VHD -SizeBytes 60GB

Get-VHD (Get-VM winshrink | Get-VMHardDiskDrive).path | where Path -match winshrink.vhdx | Resize-VHD -ToMinimumSize

Get-VHD (Get-VM winshrink | Get-VMHardDiskDrive).path | where Path -match L.vhdx | Resize-VHD -ToMinimumSize
Happy extending and shrinking your SCSI attached VHDX hdd
Comments
“The requested resize operation could not be completed because it might truncate user data residing on disk”
What am I missing?
Hey Gil, I think that first you must shrink the volume within the OS on the virtual disk before being able to shrink it, that will prevent possible data corruption, I followed the steps here which were able to do this no problems. http://www.rootusers.com/decreasing-disk-space-in-windows-server-2012-r2/ good luck!
[…] Resizing VHDX´s on running VM´s in Windows 2012 R2 Hyper-V […]